How to Record Your Screen on Windows with ShareX
This guide covers recording a screen area on Windows using ShareX, configuring FFmpeg, integrating an audio source, creating GIFs, and finding the final video.
ShareX offers the capability to capture a specific section of your Windows screen as either a video or an animated GIF. This functionality is valuable for brief software demonstrations, replicating bugs, providing support explanations, and other short clips where a comprehensive video-production application isn't necessary.
This guide details the essential recording process, explains FFmpeg's role, shows how to pick an audio source, and indicates when an alternative tool might be more suitable.
Quick steps: Open Capture, choose Screen recording or Screen recording (GIF), then choose a region, and use the recording controls to finalize. Go toTask settings → Screen recorderinitially if you need to install FFmpeg or adjust video and audio settings.
Is ShareX the Right Tool for Your Screen Recording Needs?
ShareX is effective when you require:
- To record a specific application window or a defined screen region.
- An MP4-style video, brief in duration, generated via FFmpeg.
- An animated GIF to illustrate a small visual concept.
- Customization of frame rate, audio source, output workflow, or codec.
- A recording that seamlessly integrates with ShareX's saving or upload functionalities.
Consider an alternative application if your requirements include:
- Broadcasting content live.
- Multiple scenes with transitions between them.
- Several distinct audio inputs mixed independently.
- Webcam overlays and pre-designed presentation layouts.
- Multi-track editing, captions, or a lengthy, polished production.
OBS Studiois designed for multi-source live streaming and video capture. A traditional video editor becomes more suitable when the primary work starts once the recording concludes.
Video or Animated GIF: Which to Choose?
Choose Screen recordingis appropriate for standard video. Video is typically the superior choice when your clip includes audio, extends beyond a few seconds, covers a large capture area, or features significant movement.
Choose Screen recording (GIF)is for concise, silent demonstrations meant to display directly within documents, issues, or chat applications. GIF files can become very large because their format is inefficient for detailed or lengthy recordings. Keep the capture area small and the clip brief.
If you're unsure, record video. It retains more flexibility and generally delivers better quality relative to file size.
Setting Up Your Screen Recorder
Open Task settings, then chooseScreen recorder.
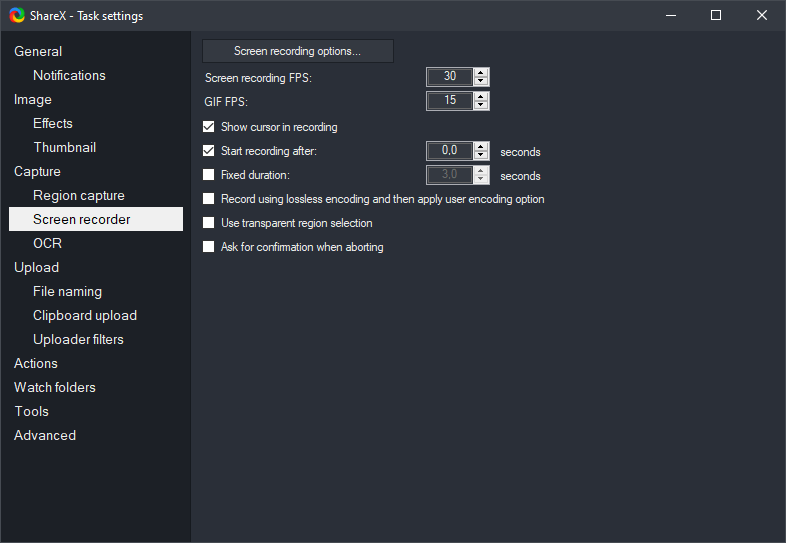
The available configuration options include:
- Screen Recording Frame Rate (FPS)sets the video's frame rate.
- GIF FPSdetermines the animated GIF's frame rate.
- Include Cursor in Recordinguseful when showing pointer movements helps clarify a task.
- Delay Start of Recordingprovides a short delay for preparation.
- Set Recording Durationto automatically stop a recording after a specific time.
- Further options are available for confirmation, region selection, and encoding.
While a higher frame rate makes motion appear smoother, it also increases encoding demands and can lead to larger file sizes. For demonstrating interface steps, a lower GIF frame rate is often perfectly adequate. Always conduct a brief test recording before capturing a lengthy session.
Install or Locate FFmpeg
ShareX utilizes FFmpeg for both video and audio encoding. Access the "Screen recording options" within the Screen recorder settings to manage this.Screen recording options.
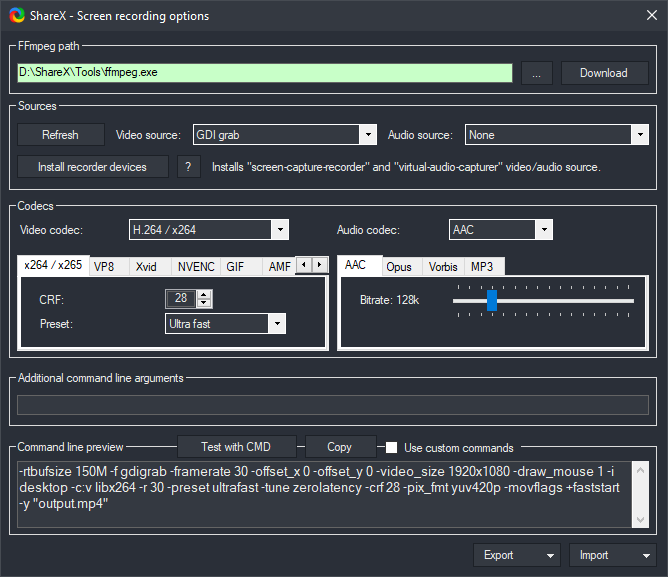
Should FFmpeg not be present, use the download control found in this window. Contemporary ShareX versions now offer FFmpeg and optional recording device installation directly from the recording options, removing the need for users to pre-install them individually.
The path shown for FFmpeg must correctly point to an existingffmpeg.exe. Ensure the FFmpeg path you use is valid for your system; avoid simply copying one from another machine.
Configure Video and Audio Settings
The recording options window provides access to:
- A video input source.
- An audio input source.
- Available video and audio codecs.
- Controls for codec-specific quality or bitrate.
- A live command-line preview.
- Optional additional arguments for FFmpeg.
When making your initial recording, simply utilize the default settings and perform a quick ten-second trial. Adjusting advanced codec options becomes beneficial only when you have a clear understanding of the specific compatibility, quality, performance, or file size issue you intend to resolve.
Capturing Sound
To incorporate sound, select an available audio source along with a suitable audio codec. The precise names of devices will vary based on the audio hardware and recording components installed on your computer.
Prior to any critical recording, observe these steps:
- Execute a brief test recording using your intended audio input.
- Review the output to verify the correct device was successfully recorded.
- Ensure the audio is clear and properly synchronized.
- Close any applications that might generate unexpected notification sounds.
- Wear headphones if there's a possibility of speaker output being picked up by a microphone.
If sound isn't required, leave the audio source configured toNone. Silent recordings prevent the accidental capture of voices, meeting audio, or notifications.
Initiate a Screen Capture
To record a specific screen area, follow these steps:
- Launch the main ShareX window or access its tray menu.
- Open Capture.
- Choose Screen recordingfor video capture, or chooseScreen recording (GIF)to create an animated GIF.
- Define the specific region you wish to record.
- Await the completion of any configured countdown.
- Perform the actions you intend to demonstrate.
- Use the recording controller or tray menu to conclude the recording once finished.
ShareX also supports recording tasks targeting the currently active window, the last used region, or a pre-configured area. You can assign a dedicated keyboard shortcut inHotkey settingsif you perform recordings frequently.
Carefully Select the Capture Region
A smaller selected area enhances subject visibility and generally results in a smaller file size.
Prior to starting your recording:
- Adjust the application to a practical dimension.
- Conceal any unrelated windows and browser tabs.
- Shut down private messages and notifications.
- Enlarge the text size if the finished video will appear in a compact publication or document.
- Include sufficient surrounding interface elements to provide context.
- Keep the cursor visible when its position illustrates an action.
Do not crop so tightly that viewers cannot identify the application or control being used.
Locate Your Completed Recording
Once ShareX finishes the recording and encoding process, the output will appear in the main window's task list. Based on your configured tasks, the file might also be saved, copied, opened, or uploaded automatically.
The task list,Historyor the specified screenshots folder, will help you find the result. If the recording was uploaded automatically, review the local file before distributing the URL and confirm the remote destination is suitable for the content.
Enhance Recording Quality and Performance
If a recording appears choppy or encoding is slow:
- Reduce the captured area.
- Lower the frame rate.
- Close other applications that are consuming significant CPU or GPU resources.
- Experiment with a codec that your hardware supports efficiently.
- Avoid capturing a high-resolution full screen when only a small section is relevant.
If text is hard to read:
- Record at the display's native resolution instead of resizing the video later.
- Increase the application text size or browser zoom level before recording.
- Minimize unnecessary movement.
- After each important action, pause for a moment to allow the viewer to process it.
Hardware-accelerated codecs can boost performance on compatible systems, but outcomes vary depending on the specific GPU, driver, codec, and chosen settings. Rather than assuming one encoder is consistently faster or superior, always evaluate the actual output.
Frequent Issues
FFmpeg Is Not Present
Open Task settings → Screen recorder → Screen recording options, then utilize the FFmpeg download control and verify that the path has been filled in.
No Sound in Recording
Ensure the audio source is not set toNone, confirm the intended device is operational, and record a brief test. Connecting headsets, docks, monitors, or virtual audio devices can alter device names.
GIF File Size Is Too Large
Reduce the recording's length, decrease its dimensions, lower the GIF's frame rate, or opt for video instead.
Incorrect Area Was Captured
Stop the current capture and begin again, carefully selecting the recording region. For repeated captures of the same area, configure a custom region or reuse the task that records the last-used region.
Private Information Appeared in Clip
Do not rely on a small preview. Before uploading or sharing, watch the complete recording. If private content is present, re-record the sequence after removing that material, rather than attempting to conceal moving information frame by frame.
An Effective Recording Process
For brief bug reports and support demonstrations, a reliable method involves these steps:
- Prepare the application and remove any sensitive information.
- Capture a small area as video at a suitable frame rate.
- Include the cursor if it helps clarify the interaction.
- Keep the clip under one minute when feasible.
- Review the entire file locally.
- Only upload or attach it after a full review.
- Provide written reproduction steps along with the video.
While a recording helps illustrate timing and motion, it should complement, not replace, searchable text detailing the expected outcome, actual result, environment, and specific steps.
Creating a Brief Windows Screen Recording
Before capturing essential content, install ShareX and conduct a brief ten-second local test. This allows you to verify your video and audio configurations.
Get ShareX