ShareX Screen Recorder for Windows
What the ShareX screen recorder can and cannot do, and how to get a clean short recording on the first try.
ShareX is a versatile, free, and open-source tool for Windows that excels at screen capture, image editing, and file sharing. Among its many capabilities, ShareX includes a powerful screen recorder, allowing you to capture video of your desktop activity. This guide will walk you through using the ShareX screen recorder to create video clips, animated GIFs, and more, all within a familiar Windows environment.
Whether you need to demonstrate software, create tutorials, or record a fleeting moment on your screen, the ShareX screen recording feature offers flexibility and control. It integrates seamlessly with ShareX's other functions, enabling you to capture, edit, and share your recordings efficiently.
What the ShareX Screen Recorder Is Built For
The ShareX screen recorder leverages FFmpeg, a robust open-source multimedia framework, to handle video and audio encoding. This integration allows ShareX to produce high-quality screen recordings in various formats. It's designed for users who need a straightforward way to capture screen activity without the complexity of dedicated video editing suites.
Key features of the ShareX screen recording tool include:
- Flexible Capture Regions: Record your entire screen, a specific window, or a custom region.
- Audio Support: Capture system audio, microphone input, or both, alongside your screen activity.
- Multiple Output Formats: Save recordings as MP4, WebM, GIF, and other video formats.
- Integrated Workflow: After recording, ShareX can automatically perform tasks like uploading the video, copying a link to your clipboard, or opening the file in a specified application.
- Customization: Extensive screen recording settings in depth allow you to fine-tune codecs, frame rates, quality, and more to suit your needs.
While ShareX is not a full-fledged video editor, its screen recording capabilities are more than sufficient for most casual and power users who need to quickly capture and share screen-based content.
Record a Region, Window, or Full Screen
ShareX provides several options for defining the area of your screen you wish to record. This flexibility ensures you capture only what's necessary, reducing file size and improving clarity.
Recording a Region
This is often the most precise way to record, allowing you to manually define a rectangular area on your screen.
- Right-click the ShareX icon in the system tray (usually located in the bottom-right corner of your screen).
- Hover over Capture.
- Hover over Screen recording.
- Select Start screen recording (FFmpeg).
- Your cursor will change to a crosshair. Click and drag to draw a rectangle over the desired recording area. Release the mouse button to start recording.
Recording an Active Window
To capture the contents of a specific application window:
- Right-click the ShareX icon in the system tray.
- Hover over Capture.
- Hover over Screen recording.
- Select Start screen recording (GIF) for GIF, or Start screen recording (FFmpeg) for video.
- Click on the window you wish to record. The recording will begin immediately, confined to that window's boundaries.
Recording the Full Screen
If you need to capture everything displayed on your primary monitor:
- Right-click the ShareX icon in the system tray.
- Hover over Capture.
- Hover over Screen recording.
- Select Start screen recording (FFmpeg).
- Instead of drawing a region, press the Enter key. This will automatically select your primary monitor for recording.
You can also use a step-by-step screen recording walkthrough to get started quickly.
Video Recording vs GIF Recording
ShareX offers two primary modes for screen recording: traditional video (using FFmpeg) and animated GIF. Each has distinct advantages and is suited for different use cases.
Video Recording (FFmpeg)
When you choose Start screen recording (FFmpeg), ShareX records your screen activity into a video file, typically MP4 or WebM. This mode is ideal for:
- High Quality: Capturing smooth, high-resolution footage with accurate colors.
- Longer Durations: Better suited for recordings that last more than a few seconds or minutes, as video files are generally more efficient for longer clips.
- Audio Inclusion: Essential when you need to record system sounds, microphone input, or both.
- Smaller File Sizes for Quality: While a GIF of the same duration might be smaller, a video file will offer significantly better visual quality for a comparable file size.
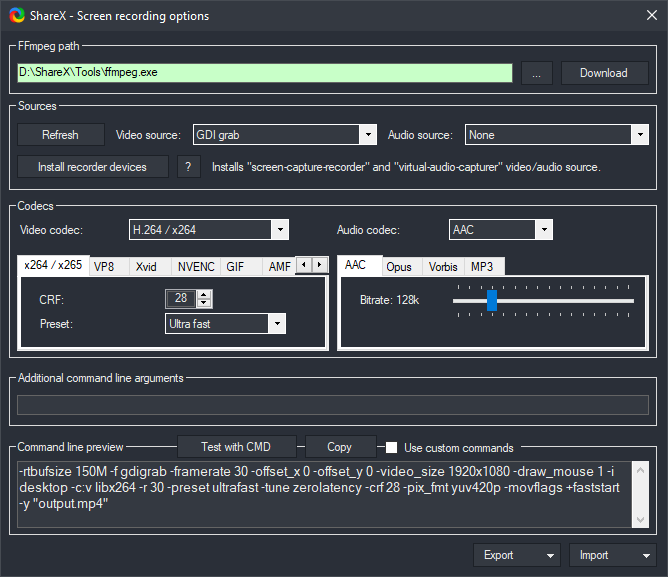
You can configure the video codec (e.g., H.264, H.265, VP8, VP9), quality, and frame rate within Task settings > Screen recorder > Screen recording options. This allows for fine-tuning the balance between file size and visual fidelity.
GIF Recording
When you select Start screen recording (GIF), ShareX creates an animated GIF. This mode is best for:
- Short, Looping Demonstrations: Perfect for illustrating quick UI interactions, bug reports, or short visual guides.
- Broad Compatibility: GIFs are widely supported across web browsers, messaging apps, and forums without needing a video player.
- No Audio: GIFs inherently do not support audio. If sound is required, use video recording.
- Smaller File Sizes for Short Clips: For very brief, simple animations, a GIF can sometimes be smaller than a video, especially if color depth is reduced. However, longer or more complex GIFs can become very large.
GIF recordings have fewer configuration options compared to FFmpeg video recordings. You can adjust the frame rate, but options for codecs and audio are not applicable. Keep GIF recordings short to avoid excessively large files, which can be slow to load and share.
Adding Audio to a Recording
Including audio in your screen recordings can significantly enhance their clarity and usefulness, especially for tutorials, presentations, or bug reports. ShareX, through its FFmpeg integration, allows you to capture both system audio and microphone input.
Configuring Audio Sources
Before you start recording, you need to tell ShareX which audio sources to use. These settings are found within the Task settings.
- Right-click the ShareX icon in the system tray.
- Select Task settings....
- In the left-hand menu, navigate to Screen recorder.
- Click on Screen recording options....
- In the "Screen recording options" window, look for the Audio source section.
- You will see two drop-down menus:
- Audio source 1: Typically used for your system's output audio (what you hear through your speakers or headphones). Select your default playback device here (e.g., "Speakers (Realtek High Definition Audio)").
- Audio source 2: Typically used for your microphone input. Select your connected microphone here (e.g., "Microphone (USB Audio Device)").
If you only want system audio, select your playback device for Audio source 1 and set Audio source 2 to "None". If you only want microphone audio, set Audio source 1 to "None" and select your microphone for Audio source 2. To record both, select appropriate devices for both.
- Click OK to save your audio source selections.
Once configured, any screen recording initiated using Start screen recording (FFmpeg) will include the selected audio sources. Remember that GIF recordings do not support audio.
Troubleshooting Audio
If you're experiencing issues with audio in your recordings:
- Check Device Selection: Ensure you've selected the correct audio devices in the "Screen recording options." Sometimes Windows assigns generic names, so you might need to experiment or check your Windows Sound settings to identify the correct device.
- Volume Levels: Verify that the volume levels for both your playback device and microphone are appropriately set in Windows Sound settings.
- Exclusive Mode: Some audio drivers can cause conflicts with "Exclusive Mode" in Windows sound settings. Try disabling "Allow applications to take exclusive control of this device" for your playback and recording devices.
- FFmpeg Dependencies: Ensure FFmpeg is correctly set up. ShareX usually handles this automatically, but if you've manually configured FFmpeg paths, double-check them in Task settings > Screen recorder. If you still encounter problems, consult resources on how to fix recordings that fail.
Stopping, Reviewing, and Sharing the Clip
Once you've captured your screen recording, ShareX provides intuitive ways to stop the recording, review the output, and share it with others.
Stopping the Recording
There are several ways to stop an active screen recording:
- Hotkey: The default hotkey to stop a screen recording is Shift + Print Screen. You can customize this in Hotkey settings.
- System Tray Icon: Right-click the ShareX icon in the system tray. A menu will appear with an option like "Stop screen recording." Select it.
- Recording Indicator: If you have the "Show recording indicator" option enabled (in Task settings > Screen recorder), a small overlay will appear on your screen during recording. Clicking this indicator or its stop button will end the recording.
Upon stopping, ShareX will process the recording. Depending on your After capture tasks and After upload tasks, it might automatically save the file, copy it to the clipboard, upload it to a destination, or open it in an application.
Reviewing the Clip
After the recording is complete, you can review it:
- History Window: Open the ShareX main window and click on History. Your most recent recordings will appear here. Double-clicking a thumbnail will open the video in your default media player.
- Image History: While primarily for images, recordings also appear in Image history.
- Output Folder: By default, ShareX saves recordings to a specific folder (usually
Documents\ShareX\Screenshots). You can open this folder directly from the main window by clicking Open image folder.
Sharing the Clip
ShareX streamlines the sharing process through its "After capture tasks" and "After upload tasks."
- Configure Destinations: In the ShareX main window, click on Destinations. Here you can set up various file uploaders (e.g., Imgur, Google Drive, custom FTP servers) and URL shorteners.
- Set After Capture Tasks:
- Right-click the ShareX system tray icon.
- Hover over After capture tasks.
- Common options include:
- Save image to file: Saves the recording locally.
- Copy file to clipboard: Puts the video file directly on your clipboard for pasting.
- Upload image: Uploads the recording to your configured destination.
- Copy URL to clipboard: If uploaded, copies the direct link to the video.
- Automated Workflow: For example, you might set your "After capture tasks" to "Save image to file" and "Upload image," and your "After upload tasks" to "Copy URL to clipboard." This way, after recording, the video is saved locally, uploaded, and its shareable link is automatically placed on your clipboard, ready to paste into an email or chat.
This automated workflow makes sharing your screen recordings incredibly efficient.
Keeping File Size Under Control
Screen recordings, especially videos, can quickly accumulate large file sizes, which impacts storage, upload times, and sharing. ShareX provides several settings to help manage and reduce file size without drastically compromising quality.
Key Settings for File Size Reduction
Access these settings via Task settings > Screen recorder > Screen recording options...
- Video Codec:
- H.264 (x264): A widely supported and efficient codec. It offers a good balance of quality and file size for most uses.
- H.265 (HEVC): Generally more efficient than H.264, producing smaller files for the same quality, but requires more processing power and might have slightly less universal playback compatibility on older systems.
- VP8/VP9 (WebM): Open-source alternatives, often used for web video. VP9 is more efficient than VP8.
Experiment with different codecs to find the best balance for your system and target audience.
- CRF (Constant Rate Factor) / Quality:
- For H.264/H.265, CRF is a quality-based encoding method. Lower CRF values (e.g., 18-23) result in higher quality and larger files. Higher values (e.g., 28-32) yield lower quality and smaller files. A value around 23-26 is often a good starting point for web-friendly video.
- For VP8/VP9, a "Quality" slider or numerical input achieves a similar effect.
- Frame Rate (FPS):
- The default 30 FPS is suitable for most screen recordings.
- Reducing the frame rate (e.g., to 15 or 20 FPS) can significantly decrease file size, especially if the screen activity is not highly dynamic (e.g., static documents, slow scrolling). For fast-paced content, 30 FPS or higher is preferable.
- Resolution:
- Recording a smaller region or downscaling the output resolution reduces the total number of pixels, directly impacting file size.
- You can specify a custom resolution or scale factor in the "Screen recording options" if you need to record a large area but output a smaller video.
- Preset:
- FFmpeg presets (e.g., "ultrafast", "superfast", "fast", "medium", "slow") control the encoding speed vs. compression efficiency. Faster presets result in larger files but encode quicker. Slower presets produce smaller files but take longer to encode. "Medium" is a good default.
- GIF Specifics:
- For GIF recordings, the primary factor is duration and frame rate. Keep GIFs short and use a lower frame rate if motion is minimal.
- GIFs are inherently less efficient than modern video codecs for most content, so use them only when the GIF format is specifically required.
By adjusting these parameters, you can effectively manage the size of your ShareX screen recordings to suit your storage and sharing requirements.
When to Use a Dedicated Recorder Instead
While the ShareX screen recorder is powerful and convenient for many tasks, there are situations where a dedicated, more specialized screen recording or video editing application might be more appropriate.
Limitations of ShareX for Complex Video Needs
- Advanced Editing Features: ShareX does not include advanced video editing capabilities like trimming, cutting, merging clips, adding transitions, special effects, or multi-track audio editing. For these, you would need a dedicated video editor.
- High-Performance Gaming: While ShareX can record games, its primary FFmpeg integration might not be as optimized for high-frame-rate, full-screen game capture as dedicated gaming capture software (e.g., OBS Studio, NVIDIA ShadowPlay, AMD ReLive). These tools often have lower performance overhead and features specifically for gaming.
- Live Streaming: ShareX is not designed for live streaming to platforms like Twitch or YouTube. Dedicated streaming software offers robust features for scene management, overlays, chat integration, and platform-specific optimizations.
- Complex Audio Mixing: While ShareX can record multiple audio sources, it doesn't offer advanced audio mixing, noise reduction, or audio processing features during recording.
- Professional Production: For professional-grade tutorials, presentations, or marketing videos requiring polished production values, a full-featured video creation suite would be necessary.
When ShareX Excels
ShareX remains an excellent choice for:
- Quick Demos and Tutorials: Rapidly creating short, clear demonstrations of software features or workflows.
- Bug Reporting: Easily capturing reproducible steps for software bugs.
- Animated GIFs: Creating small, looping animations for web or chat.
- Personal Use: Recording online meetings, webinars, or any desktop activity for personal reference.
- Integration into a Workflow: When you need to capture, save, upload, and share a video quickly as part of a larger workflow, especially if you're already using ShareX for screenshots.
In summary, if your needs extend beyond basic screen capture and simple recording into areas of advanced video production, live streaming, or highly optimized gaming capture, exploring dedicated software solutions alongside ShareX would be beneficial. For everyday screen recording on Windows, ShareX is an outstanding, free option.
Frequently Asked Questions
How do I record my entire screen with ShareX?
To record your entire primary screen, right-click the ShareX icon in the system tray, go to Capture > Screen recording > Start screen recording (FFmpeg), and then press the Enter key instead of drawing a region. This will automatically select your primary monitor for recording.
Can I record audio from my microphone and system sounds simultaneously?
Yes, ShareX allows you to record both microphone input and system audio. Go to Task settings > Screen recorder > Screen recording options... and select your desired microphone for "Audio source 2" and your system's playback device (e.g., speakers) for "Audio source 1."
Why is my ShareX recording a GIF instead of a video?
You likely selected "Start screen recording (GIF)" instead of "Start screen recording (FFmpeg)." To record a video, ensure you choose the FFmpeg option from the Capture > Screen recording menu. GIFs are suitable for short, silent animations, while FFmpeg records traditional video files with audio support.
My screen recording has no sound. What should I check?
First, ensure you are using "Start screen recording (FFmpeg)" as GIF recordings do not support audio. Next, verify your audio sources in Task settings > Screen recorder > Screen recording options... by selecting the correct playback and microphone devices. Also, check your Windows sound settings to ensure device volumes are not muted or too low.
How do I stop a ShareX screen recording?
You can stop a ShareX screen recording by pressing the default hotkey (Shift + Print Screen), right-clicking the ShareX system tray icon and selecting "Stop screen recording," or by clicking the stop button on the recording indicator if it's enabled.
Get ShareX for Windows
ShareX is free and open source. Install it, then come back and try the steps above.
Download ShareX