ShareX Hotkeys and Keyboard Shortcuts
How ShareX hotkeys are structured, which bindings are worth learning, and how to keep them stable across machines.
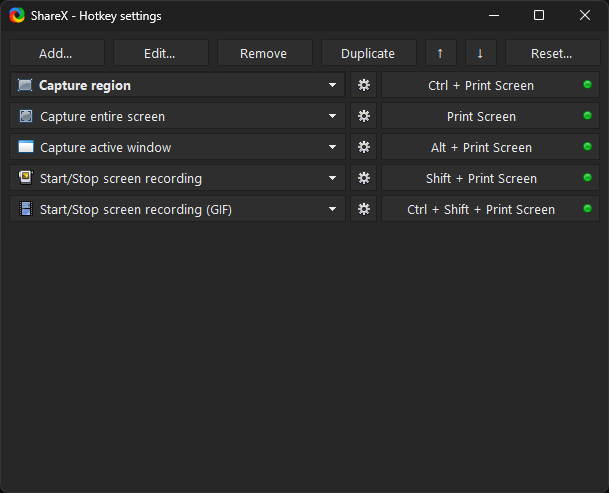
ShareX offers extensive customization for hotkeys, allowing you to trigger various capture methods, tools, and actions with a single keystroke or combination. This flexibility helps streamline your workflow, enabling you to perform common tasks quickly and efficiently without navigating through menus. Understanding how to set up and manage these hotkeys is key to maximizing your productivity with ShareX. Hotkeys can be configured for almost any ShareX function, from capturing a specific region of your screen to uploading files to a custom destination. By assigning keyboard shortcuts, you can execute complex workflows instantly, making your screen capture and sharing process smoother.
How Hotkeys Work in ShareX
ShareX hotkeys are global keyboard shortcuts that allow you to execute specific actions from anywhere in Windows, even when the ShareX main window is minimized or not in focus. This means you can quickly capture screens, record videos, or activate tools without interrupting your current work. When you press a configured hotkey, ShareX immediately performs the associated task. For example, a hotkey assigned to "Capture Region" will activate the region selection tool, letting you draw a box around the area you want to capture. Similarly, a hotkey for "Upload from clipboard" will take the current image or text in your clipboard and process it according to your defined after-capture and after-upload tasks. ShareX distinguishes between "Capture" hotkeys and "Workflow" hotkeys. Capture hotkeys are primarily for screen capture methods like region, full screen, or active window. Workflow hotkeys can be assigned to a wider range of actions, including specific tools, custom uploaders, or even complex actions you've defined. You can find a comprehensive list of default hotkeys and their functions in the
default keybind documentation.
Accessing Hotkey Settings
To manage your hotkeys, open the ShareX main window. On the left-hand menu, click on "Hotkey settings." This will open a dedicated window where you can view, add, edit, and remove all your custom hotkey configurations. The Hotkey settings window lists all currently defined hotkeys, showing the associated action and the key combination.
Add, Edit, and Remove a Hotkey
Managing your hotkeys in ShareX is a straightforward process, providing a centralized location to customize your keyboard shortcuts.
Adding a New Hotkey
To add a new hotkey:
- Open the ShareX main window.
- Click on "Hotkey settings" in the left-hand menu.
- In the Hotkey settings window, click the "Add" button at the bottom. This will open the "Hotkey task settings" window.
- In the "Hotkey task settings" window, you'll first choose the "Task" you want to associate with the hotkey. This dropdown menu lists all available capture methods, tools, and actions. For example, you might select "Capture" > "Region" for a standard screenshot.
- Next, click into the "Hotkey" input field and press the desired key combination on your keyboard (e.g., Ctrl + Shift + C). ShareX will display the pressed keys.
- (Optional) Configure Per-Hotkey Task Settings if you want this specific hotkey to behave differently from your global settings.
- Click "OK" to save the new hotkey.
After adding, the new hotkey will appear in the main Hotkey settings list.
Editing an Existing Hotkey
To modify an existing hotkey:
- Open the ShareX main window.
- Click on "Hotkey settings" in the left-hand menu.
- In the Hotkey settings window, select the hotkey you wish to edit from the list.
- Click the "Edit" button at the bottom, or double-click the hotkey entry. This will reopen the "Hotkey task settings" window for that specific hotkey.
- You can then change the assigned "Task," modify the "Hotkey" combination, or adjust any of the per-hotkey task settings.
- Click "OK" to apply your changes.
Removing a Hotkey
If you no longer need a specific hotkey:
- Open the ShareX main window.
- Click on "Hotkey settings" in the left-hand menu.
- In the Hotkey settings window, select the hotkey you wish to remove from the list.
- Click the "Remove" button at the bottom.
- Confirm your decision if prompted. The hotkey will be immediately removed from the list and will no longer trigger its associated action.
If you find that your
hotkeys stop workingafter making changes, it's a good idea to check for conflicts with other applications or ensure that ShareX is running.
Per-Hotkey Task Settings
One of ShareX's most powerful features is the ability to customize task settings for individual hotkeys, overriding your global "Task settings." This allows for highly flexible workflows where different hotkeys can perform the same base action (e.g., capture a region) but with different post-capture behaviors. When you are in the "Hotkey task settings" window (either adding or editing a hotkey), you will see several tabs on the right side: "After capture tasks," "After upload tasks," "Destinations," and "Image effects." These tabs mirror the global "Task settings" available from the main ShareX window.
Customizing After Capture Tasks
The "After capture tasks" tab allows you to specify what happens immediately after an image or video is captured using *this specific hotkey*. For instance, you could have one hotkey for "Capture Region" that automatically copies the image to the clipboard and another "Capture Region" hotkey that automatically saves the image to a file and opens it in the image editor. To set these:
- In the "Hotkey task settings" window, navigate to the "After capture tasks" tab.
- Check or uncheck the boxes next to the desired actions (e.g., "Copy image to clipboard," "Save image to file," "Open image in editor," "Upload image").
These selections will override the global "After capture tasks" only when this particular hotkey is used.
Customizing After Upload Tasks
Similarly, the "After upload tasks" tab lets you define actions that occur after a file has been successfully uploaded using *this specific hotkey*. You might want one hotkey to upload an image and automatically copy its URL to the clipboard, while another hotkey uploads a file and immediately shortens the URL. To set these:
- In the "Hotkey task settings" window, navigate to the "After upload tasks" tab.
- Check or uncheck the boxes next to the desired actions (e.g., "Copy URL to clipboard," "Show QR code," "Shorten URL").
Customizing Destinations
The "Destinations" tab enables you to choose specific upload destinations for a hotkey, overriding your global destination settings. This is particularly useful if you frequently upload to different services for different purposes. For example, one hotkey could upload all captures to Imgur, while another sends them to a custom SFTP server. To set these:
- In the "Hotkey task settings" window, navigate to the "Destinations" tab.
- Select the "Image uploader," "File uploader," "Text uploader," and "URL shortener" from the dropdown menus.
Customizing Image Effects
The "Image effects" tab allows you to apply a specific set of image effects to captures made with *this hotkey*. This is distinct from global image effects and can be used to, for example, automatically add a watermark or border to all screenshots taken with a specific work-related hotkey, without affecting personal captures. To set these:
- In the "Hotkey task settings" window, navigate to the "Image effects" tab.
- Check "Override image effects" to enable per-hotkey effects.
- Click "Image effects..." to open the Image effects window, where you can configure a unique set of effects for this hotkey.
By leveraging per-hotkey task settings, you can create highly specialized ShareX workflows tailored to your exact needs, making it a powerful tool for various scenarios. You can find more details on how these tasks fit into the broader application in
the ShareX settings map.
A Modifier Pattern That Stays Memorable
When configuring ShareX hotkeys, adopting a consistent modifier pattern can significantly improve memorability and reduce conflicts. Modifier keys like
Ctrl,
Shift, and
Altare excellent for creating unique combinations.
Recommended Pattern for Screenshot Shortcuts
For general screenshot actions, consider using
Ctrl+
Shift+ a letter.
- Ctrl + Shift + R for "Capture Region"
- Ctrl + Shift + W for "Capture Active Window"
- Ctrl + Shift + F for "Capture Fullscreen"
This pattern is intuitive because the letter often corresponds to the first letter of the capture type. You can find more
shortcut recommendations for screenshotsin our dedicated guide.
Pattern for Other Actions and Tools
For other tools or less frequent actions, you might introduce a third modifier or use a different primary modifier. For instance:
- Ctrl + Alt + C for "Color Picker"
- Ctrl + Alt + G for "GIF Recorder"
- Ctrl + Shift + Alt + U for "Upload from clipboard"
The key is consistency. Once you establish a pattern, stick to it. This makes it easier to recall your hotkeys without constantly referring to the settings. Avoid single-key hotkeys (e.g., just
F1) or simple two-key combinations (e.g.,
Ctrl+
C) as these are highly likely to conflict with system-wide or application-specific shortcuts in other programs.
Print Screen and Windows Key Combinations
The
Print Screen(
PrtSc) key and combinations involving the
Windowskey (
Win) are special cases for hotkey assignments due to their default system behavior.
Using the Print Screen Key
By default, pressing
Print Screenin Windows copies the entire screen to the clipboard. ShareX can override this behavior, making it a very convenient key for quick captures. To assign
Print Screento a ShareX action:
- Open "Hotkey settings."
- Add a new hotkey or edit an existing one.
- In the "Hotkey" field, simply press the Print Screen key. ShareX will recognize it.
- Assign your desired action, such as "Capture Region."
Once configured, pressing
Print Screenwill trigger the ShareX action instead of the default Windows behavior. This is a popular choice for users who want
Print Screento immediately activate the region capture tool.
Windows Key Combinations
The
Windowskey is often used by the operating system for various functions (e.g.,
Win+
Dto show the desktop,
Win+
Shift+
Sfor the Snipping Tool). While ShareX can register hotkeys with the
Windowskey, it's generally recommended to use these combinations sparingly to avoid conflicts with built-in Windows shortcuts. If you choose to use
Winkey combinations:
- Ensure the combination you pick does not conflict with a critical Windows shortcut you use frequently.
- Test the hotkey thoroughly after assignment to confirm it works as expected without unintended side effects.
For example,
Win+
Alt+
Ris a common hotkey for Xbox Game Bar screen recording. If you assign this to ShareX, it might interfere with that functionality. Using
Ctrl+
Shift+
Altwith another key is generally safer for avoiding system conflicts.
Keyboard-driven capture is only one part of a productive Windows setup. If you like building your own shortcuts beyond what an app offers out of the box, AutoHotkeyTools is a community workshop for AutoHotkey scripting on Windows, with materials on custom hotkeys, text expansion, and desktop macros that pair well with a capture workflow like the one described above.
Moving Hotkeys to Another PC
If you need to transfer your customized ShareX hotkey settings to a new computer or another Windows installation, you can do so by exporting and importing your ShareX configuration. This process ensures that all your personalized hotkeys, along with other settings, are preserved. ShareX stores its configuration, including hotkey definitions, in a set of files within your ShareX application data folder.
Exporting ShareX Configuration
- Open the ShareX main window.
- On the left-hand menu, click on "Application settings."
- In the "Application settings" window, click the "Configuration" tab.
- Click the "Export..." button.
- Choose a location to save your configuration file (e.g., your Documents folder or a USB drive). The file will typically be named
ShareX-Config-YYYY-MM-DD.sxcu.
This single file contains all your ShareX settings, including your custom hotkeys, after capture tasks, upload destinations, and more.
Importing ShareX Configuration
On the new Windows PC where you want to apply these settings:
- Install ShareX if it's not already installed.
- Open the ShareX main window.
- On the left-hand menu, click on "Application settings."
- In the "Application settings" window, click the "Configuration" tab.
- Click the "Import..." button.
- Browse to the
.sxcuconfiguration file you exported earlier and select it. - ShareX will prompt you to confirm the import. Note that importing a configuration will overwrite your current settings on this PC.
- After the import is complete, ShareX may restart or prompt you to restart it for all changes to take effect.
Once ShareX restarts, all your hotkeys and other settings will be active on the new PC, allowing you to continue your workflow without needing to reconfigure everything manually.
Frequently Asked Questions
Why are my ShareX hotkeys not working?
Hotkeys might stop working due to conflicts with other applications, ShareX not running in the background, or incorrect hotkey assignments. Ensure ShareX is running, check for conflicting global hotkeys from other software, and verify your hotkey settings in the ShareX Hotkey settings window. Sometimes, simply restarting ShareX can resolve temporary issues.
Can I assign multiple hotkeys to the same action?
Yes, ShareX allows you to assign multiple distinct hotkey combinations to the same action. For example, you could have
Ctrl+
Shift+
Rand
Print Screenboth set to "Capture Region." This provides flexibility for different usage scenarios or personal preferences.
How do I know if a hotkey is already in use by Windows or another program?
ShareX does not actively detect conflicts with other applications or Windows itself during hotkey assignment. If you assign a hotkey that is already in use, the other application's action might take precedence, or neither might work reliably. It's best to choose complex combinations using three or more modifier keys to minimize the chance of conflicts.
Is there a way to temporarily disable all ShareX hotkeys?
ShareX does not have a single "disable all hotkeys" button. However, you can temporarily exit ShareX from its tray icon to prevent any hotkeys from being active. Alternatively, you can go to the "Hotkey settings" window and manually remove or edit the hotkeys you wish to disable.
Get ShareX for Windows
ShareX is free and open source. Install it, then come back and try the steps above.
Download ShareX