How to Use ShareX on Windows
A complete walkthrough of ShareX on Windows, from the first install to a capture workflow you can repeat every day.
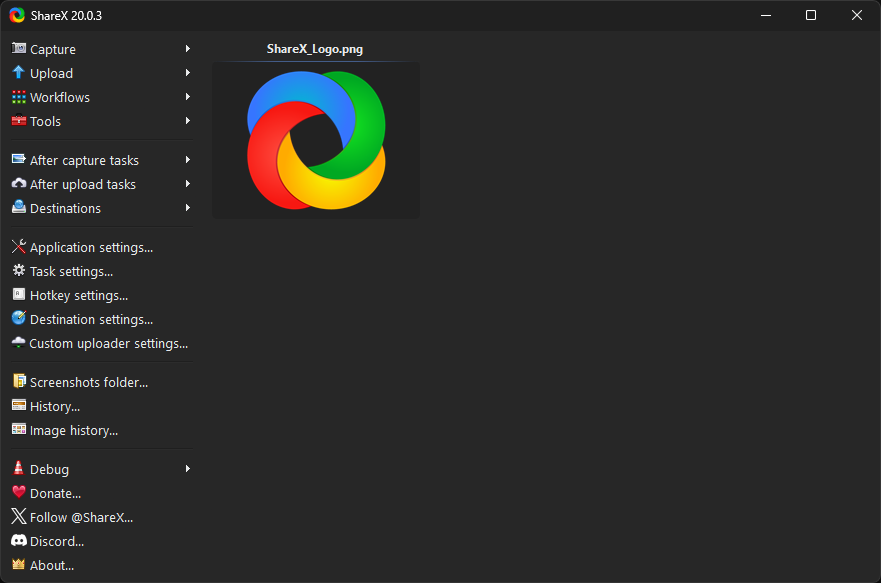
ShareX is a powerful and versatile open-source tool for Windows that simplifies capturing, annotating, and sharing various forms of content from your screen. Whether you need to quickly grab a screenshot, record a GIF, or upload files, ShareX offers a wide array of features to streamline your workflow. This guide will walk you through the essential steps to get started and effectively use ShareX on your Windows PC. This guide is designed to help you understand the core functionalities of ShareX, from initial setup to advanced customizations, ensuring you can leverage its full potential for your daily tasks.
What ShareX Does on a Windows PC
ShareX provides a comprehensive suite of tools for screen capture, file sharing, and productivity on Windows. Its primary function is to capture content from your screen in various ways, including full screen, active window, specific regions, or even scrolling content. Beyond simple image captures, ShareX can record screen activity as video or animated GIFs using FFmpeg, perform optical character recognition (OCR) on screen regions, and capture screenshots at timed intervals. Once content is captured, ShareX offers an integrated image editor with annotation tools, allowing you to highlight, blur, draw, and add text before sharing. A wide range of image effects can also be applied automatically or manually. For sharing, ShareX supports numerous file upload destinations, including popular image hosts, file hosting services, and custom uploaders. It can automatically shorten URLs, copy files to the clipboard, save them to a local folder, or print them. All these actions can be automated through customizable after-capture and after-upload tasks, making it a highly efficient tool for many workflows. Additionally, ShareX includes various utility tools such as a color picker, screen ruler, image combiner, QR code generator, and video converter.
Install ShareX and Open It for the First Time
Before you can begin using ShareX, you'll need to install it on your Windows PC. ShareX is free and open source, available directly from its official website.
- First, Download ShareX for Windows from the official website. You can choose either the installer or the portable version. For most users, the installer is recommended as it integrates better with your system.
- Run the downloaded installer. Follow the on-screen prompts to complete the installation. This typically involves accepting the license agreement and choosing an installation directory.
- Once installation is complete, launch ShareX. You can usually find it in your Start Menu or by searching for "ShareX."
- The first time you open ShareX, it might appear as a small icon in your system tray (the area near the clock on your taskbar). Double-clicking this icon will open the main ShareX window.
- You may be prompted to install FFmpeg if you plan to use screen recording or GIF recording features. It's recommended to accept this prompt as FFmpeg is essential for video-related captures. ShareX will handle the download and installation of FFmpeg automatically.
The main ShareX window provides access to all its features, settings, and tools. You'll see a menu on the left side with options like "Capture," "Workflow," "After capture tasks," "Tools," and "Application settings."
Your First Capture in Under a Minute
Let's perform a basic screen capture to get familiar with ShareX. We'll capture a region of your screen, which is one of the most common and flexible capture methods.
- Open the ShareX main window.
- On the left-hand menu, click on "Capture."
- From the "Capture" submenu, select "Region." Alternatively, you can use the default hotkey for region capture, which is usually Shift + Print Screen.
- Your screen will dim, and a crosshair cursor will appear.
- Click and drag your mouse to select the area of the screen you wish to capture. As you drag, a rectangle will show the selected region, and you'll see the dimensions in pixels.
- Release the mouse button when you have selected the desired region.
- By default, ShareX will immediately perform several actions: it will copy the image to your clipboard, save it to your default ShareX screenshots folder, and open it in the built-in image editor. You will see notifications in the bottom-right corner of your screen indicating these actions.
Congratulations, you've just completed your first capture! You can now paste the image (e.g., into an email or document) or find it in your ShareX capture folder. To learn more about specific capture types, you can explore how to
take a screenshot with ShareX step by step.
Choose What Happens After a Capture
One of ShareX's most powerful features is its ability to automate actions after a capture or upload. These are configured in the "After capture tasks" and "After upload tasks" sections. By default, several tasks are enabled, but you can customize them to suit your workflow.
After Capture Tasks
These tasks execute immediately after a screenshot or screen recording is finished.
- In the main ShareX window, click "After capture tasks" on the left menu.
- You'll see a list of options with checkboxes next to them. Common options include:
- Save image: Saves the captured image to your local screenshots folder. This is usually enabled by default and highly recommended.
- Copy image to clipboard: Makes the captured image available for pasting into other applications.
- Open in image editor: Opens the captured image in ShareX's built-in editor for annotation or quick edits.
- Upload image: Automatically uploads the image to your configured destination (e.g., Imgur).
- Perform actions: Applies custom actions you've defined.
- Check or uncheck the boxes according to your preferences. For example, if you rarely need to edit images immediately, you might uncheck "Open in image editor." If you always want to upload, ensure "Upload image" is checked.
After Upload Tasks
These tasks execute after a file has been successfully uploaded to an online destination. This section becomes relevant if you have "Upload image" enabled in your "After capture tasks."
- Click "After upload tasks" in the left menu.
- Similar to after capture tasks, you'll find options like:
- Copy URL to clipboard: Copies the direct link to your uploaded file. This is extremely useful for sharing.
- Show QR code: Displays a QR code for the uploaded file's URL.
- Open URL: Opens the uploaded file's URL in your default web browser.
- Enable or disable these based on how you prefer to handle shared links. For most users, "Copy URL to clipboard" is a must-have.
By thoughtfully configuring these tasks, you can significantly reduce the manual steps involved in capturing and sharing content.
Set Up the Hotkeys You Will Actually Use
Hotkeys are central to an efficient ShareX workflow, allowing you to trigger captures and other actions instantly without opening the main window. ShareX comes with default hotkeys, but you can customize them to fit your habits. To learn more about this specific topic, you can read our guide on how to
set up ShareX hotkeys.
- In the main ShareX window, click "Hotkey settings" on the left menu.
- You'll see a list of predefined hotkey profiles. The "Default" profile contains common capture hotkeys.
- To edit an existing hotkey, click the row for the hotkey you want to change (e.g., "Region capture").
- A "Hotkey settings" window will appear. Click the input field under "Hotkey" and press the key combination you wish to use (e.g., Ctrl + Shift + C).
- You can also add new hotkeys by clicking "Add" at the bottom of the "Hotkey settings" window. This allows you to create custom hotkeys for specific capture types (e.g., "Active window capture"), tools (e.g., "Color picker"), or workflows.
- After selecting the hotkey, you can specify the "Task" it performs. This includes capture methods, after capture tasks, after upload tasks, and even specific upload destinations.
- Click "OK" to save your changes to that hotkey.
When choosing hotkeys, try to pick combinations that are easy to remember and don't conflict with hotkeys used by other applications you frequently use. A well-configured set of hotkeys can make using ShareX feel incredibly seamless.
Where Your Files Go
Understanding where ShareX saves your captures is crucial for managing your files. By default, ShareX saves all captures locally to a specific folder on your Windows PC and, if configured, uploads them to an online destination.
Local Storage
- By default, ShareX saves captures to a folder located in your "Documents" directory:
C:\Users\[Your Username]\Documents\ShareX\Screenshots. - You can access this folder directly from the ShareX main window by clicking "Application settings" > "Path" on the left menu. Here, you'll see the "Screenshots folder path" and "Uploads folder path."
- To change the default local save location:
- Click the folder icon next to "Screenshots folder path."
- Browse to your desired new folder and click "Select Folder."
- ShareX will then save all future captures to this new location.
- ShareX automatically organizes captures into subfolders based on the year and month (e.g.,
2023\11). This helps keep your screenshot folder organized over time.
Online Destinations
If you have "Upload image" enabled in your after-capture tasks, ShareX will also send your captures to an online service.
- To configure your upload destinations, click "Destinations" on the left menu.
- Select "Image uploader," "File uploader," or "Text uploader" depending on the type of content you want to upload.
- You'll see a list of pre-configured services (e.g., Imgur, Flickr, Google Photos). Select your preferred service from the list.
- For many services, you'll need to authenticate ShareX with your account by clicking the "Settings" button next to the selected uploader and following the authorization prompts.
- Once configured, ShareX will upload your captures to this service and, if enabled in "After upload tasks," copy the URL to your clipboard.
Remember that files uploaded to online services are subject to the terms and privacy policies of those services.
A Repeatable Daily Workflow
To truly leverage ShareX, integrate it into a consistent workflow. Here’s an example of a common, efficient daily workflow:
- Perform a capture: Use your custom hotkey (e.g., Shift + Print Screen) to initiate a region capture. This is quick and precise for most needs. For full-screen captures, use Print Screen.
- Optional: Annotate immediately: If "Open in image editor" is enabled in your After capture tasks, the image will open in the ShareX image editor. Quickly add arrows, text, or blur sensitive information. Close the editor when done.
- Automatic actions: ShareX will automatically save the image to your local screenshots folder, copy it to your clipboard, and upload it to your chosen online destination (e.g., Imgur).
- Share the link: Because "Copy URL to clipboard" is enabled in your After upload tasks, the link to the online image is now ready. Paste it directly into a chat, email, or document.
- Continue working: You can immediately move on to your next task without interruption, knowing the image is saved locally and shared online.
This workflow is efficient because it minimizes manual steps. The image is saved locally for your records, placed on the clipboard for immediate pasting, and uploaded with its link ready for sharing, all with a single hotkey press. You can further customize this by exploring more options in
explore ShareX settings. For a more detailed introduction to ShareX's capabilities, consider reading
a beginner-friendly ShareX starter guide.
Common Beginner Mistakes
When starting with ShareX, some common pitfalls can lead to frustration. Being aware of these can help you avoid them.
- Not configuring hotkeys: Relying solely on the main ShareX window to initiate captures is inefficient. Customizing and remembering your hotkeys (especially for region capture) is the fastest way to use the tool.
- Forgetting after-capture tasks: If you capture something and wonder where it went, you likely haven't enabled "Save image" or "Copy image to clipboard" in "After capture tasks." Similarly, if you expect a link after uploading, ensure "Copy URL to clipboard" is active in "After upload tasks."
- No upload destination set up: If "Upload image" is enabled but nothing happens, you might not have configured an image uploader under "Destinations" or authenticated it properly. ShareX needs to know *where* to send your files.
- FFmpeg not installed for video/GIF: If you try to record your screen as a video or GIF and it fails, check if FFmpeg was installed. ShareX usually prompts you, but if you dismissed it, you might need to install it manually via "Application settings" > "Path" > "FFmpeg."
- Overlooking the image editor: Many users capture and immediately share, not realizing ShareX has a powerful built-in editor for quick annotations. Enabling "Open in image editor" in "After capture tasks" can greatly enhance communication.
- Ignoring the system tray icon: ShareX primarily runs in the background. If you close the main window, it minimizes to the system tray. Right-clicking this icon provides quick access to common functions and settings.
Frequently Asked Questions
How do I capture a specific window?
To capture a specific window, open the ShareX main window, click "Capture," and then select "Active window." Alternatively, you can use the default hotkey Alt + Print Screen. This will automatically capture the window that is currently in focus.
Can I record my screen with ShareX?
Yes, ShareX can record your screen as a video or an animated GIF. Go to "Capture" > "Screen recording" or "Screen recording (GIF)." Ensure FFmpeg is installed, as it is required for these features.
Where does ShareX save my screenshots locally?
By default, ShareX saves screenshots to C:\Users\[Your Username]\Documents\ShareX\Screenshots. You can change this path in "Application settings" > "Path" in the main ShareX window.
How do I share my captures online?
To share captures online, you need to enable "Upload image" in "After capture tasks" and configure an image uploader under "Destinations" (e.g., Imgur). After a capture, ShareX will automatically upload the image and, if configured, copy the shareable URL to your clipboard.
My hotkeys aren't working. What should I do?
First, ensure ShareX is running (check the system tray). Then, go to "Hotkey settings" in the main window to verify your hotkey assignments. Conflicts with other applications or system hotkeys can sometimes prevent ShareX hotkeys from functioning.
Get ShareX for Windows
ShareX is free and open source. Install it, then come back and try the steps above.
Download ShareX