Set Up Automatic Screenshot Uploads with ShareX
Learn to configure ShareX to send screenshots to your preferred destination and automatically copy the resulting link, along with options for secure local storage and privacy.
ShareX captures screenshots, uploads them to your selected location, and copies the URL to your clipboard. This feature is highly useful for support chats, issue trackers, documentation, and other scenarios where sharing a link is faster than attaching files.
It is crucial to intentionally enable automatic uploading. A swift workflow is only beneficial if you understand the file's destination, who can access it, and how to remove it later.
Steps:Set up an image destination, then enableUpload image to host under After capture tasksand then activateCopy URL to clipboard under After upload tasks. Before you depend on this setup, test it using an image that doesn't contain sensitive information.
How ShareX Manages Uploads
The ShareX upload process involves the interaction of three distinct setting categories:
- Destination settingscontain credentials and configuration options specific to a provider.
- Destinationsdetermine which configured provider will handle images or other file types.
- After capture and after upload tasksspecify actions ShareX performs both before and after the file transfer.
This modular design allows you to apply the same provider to various workflows. For example, one hotkey might save a file locally without uploading, while another could upload and instantly copy its link.
Choosing a Storage Location for Screenshots
Before enabling automatic uploads, you should select a storage destination, considering these factors:
- Whether links offer public, private, or access-controlled sharing.
- The duration for which files are kept.
- If you can remove or replace uploaded content.
- Limitations on file size and network bandwidth.
- Requirements for accounts, billing, and authentication.
- If the service is approved for use by your organization.
- The provider's policies regarding privacy and security.
ShareX includes support for numerous integrated destinations and storage services. Additionally, it supportscustom uploaderswhen a service provides a compatible HTTP interface.
For those seeking greater control over their storage, existing documentation details how to set up withAmazon S3, Google Cloud Storage, and Cloudflare R2. These services still necessitate proper configuration of access controls, credentials, lifecycle rules, and billing.
Set Up Your Destination
While specific fields differ by provider, the general steps involved are as follows:
- Open Destination settings.
- Choose the service you plan to utilize.
- Provide or authorize the necessary account and storage details.
- Execute any available test function.
- Once configuration is successful, close the settings.
- Open Destinationsand assign that service as your image uploader.
Avoid pasting credentials into public issues, screenshots, or shared configuration files. Use only the minimum permissions required for the upload process, and rotate any credential if it becomes compromised.
Enable Automatic Upload Post-Capture
Open After capture tasks and enable Upload image to host.
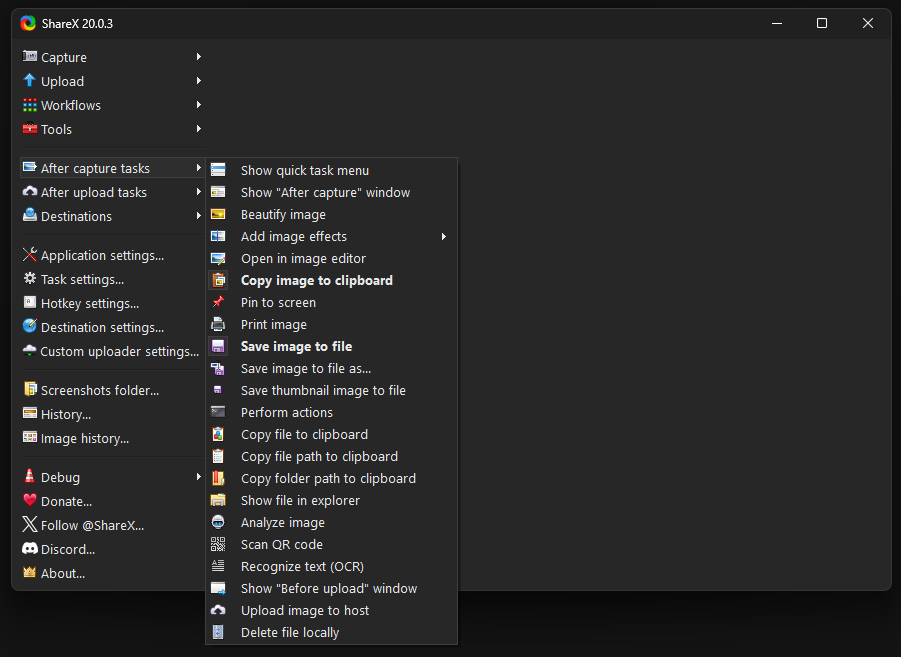
This directs ShareX to send the captured image to your chosen image destination.
You might also consider activatingSave image to filebefore the upload occurs. Maintaining a local copy can be beneficial if a remote upload fails, expires, is deleted, or needs replacement later. Ensure that the local storage location does not introduce new privacy or retention concerns.
If you wish to review each screenshot prior to it leaving your computer, activateShow "Before upload" windowor incorporate an editor step. This adds an extra step but reduces the chance of uploading an incorrect capture.
Automatic URL Copy
Open After upload tasks and enable Copy URL to clipboard.
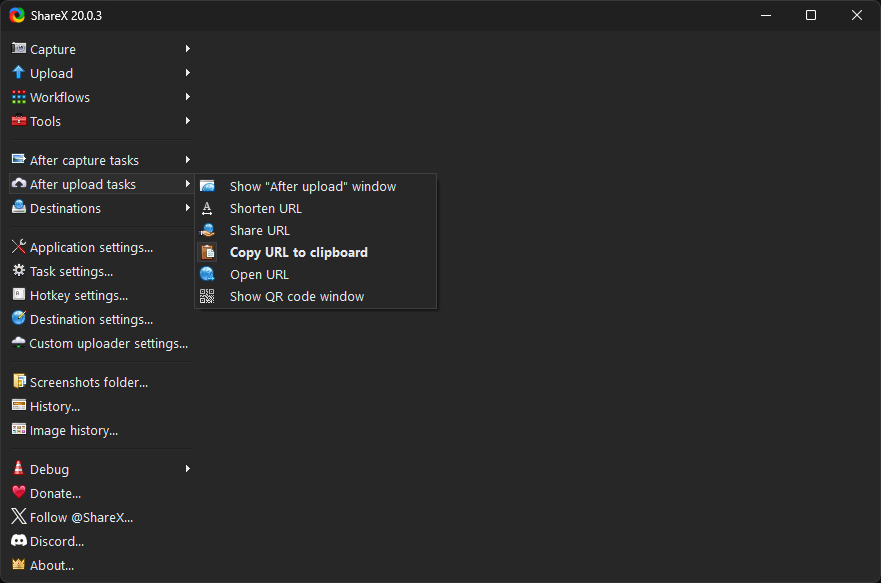
Once an upload is successful, ShareX automatically places the resulting URL onto the clipboard. This allows it to be pasted into a browser, message, document, or issue.
Additional options available after an upload include opening the URL, shortening it, sharing it, displaying the after-upload window, or showing a QR code. It's best to enable only those tasks that genuinely enhance your workflow. For instance, automatically opening every URL can become disruptive, and automatic shortening might obscure the destination domain from the recipient of the link.
Test with a non-sensitive screenshot
Before you begin using this workflow for actual tasks:
- Produce a small image that contains no private data.
- Capture it using the designated ShareX hotkey.
- Wait until the upload process completes.
- Paste the URL from your clipboard into a browser window set to private mode.
- Verify that the image loads as expected.
- Determine if the link is accessible without requiring a sign-in.
- Locate the provider's tools for deletion or management.
- Delete the test item and confirm the impact on the link.
Using a private browser window for testing helps confirm whether a link, which appears private during your signed-in session, is truly accessible to anyone possessing it.
Add annotation before upload
If a screenshot requires markup or redaction, activate the option toOpen in image editoras a post-capture action. TheShareX image editoris capable of adding arrows, text, numbered steps, blur effects, pixelation, crops, and various other annotations.
When the editor is integrated into an after-capture workflow, examine the image, then use the continue action to proceed with subsequent tasks. If the screenshot should not be uploaded, cancel the task instead.
For highly sensitive information, physically cropping it out is generally more secure than merely obscuring it visually. Ensure you inspect the final image at full size before moving forward.
Create separate local and upload hotkeys
Uploading every screenshot is seldom necessary. A more secure configuration involves:
- A default hotkey that captures and copies the image to local storage.
- Another workflow that records, lets you review, uploads, and then copies its URL.
Create or edit these in Hotkey settings and assign distinct task settings. Give each workflow a clear description so you know which action will upload before pressing the shortcut.
This approach keeps casual captures local and makes remote sharing an intentional choice.
Use a custom uploader
ShareX custom uploaders define an HTTP request and explain how ShareX should extract the resulting URL from the response. A .sxcu configuration can include:
- Request URL and method.
- Headers and authentication values.
- Form, body, or file fields.
- Response parsing rules.
- URL, thumbnail, deletion, or error results.
Read the custom uploader documentation before importing or sharing a configuration. A custom uploader can transmit files and credentials, so use configurations only from sources you trust and inspect what they send.
Stop automatic uploads
To return to a local-only workflow:
- Open After capture tasks.
- Disable Upload image to host.
- Disable any other upload-related task you no longer want.
- Take a non-sensitive test capture.
- Confirm no upload appears in the task result.
Changing the selected destination does not disable uploading. The Upload image to host task controls whether the capture is sent to the selected image uploader.
Troubleshooting
Screenshot Saved Locally, Not Uploaded
Confirm Upload image to hostis active, a valid image destination has been selected, and its authentication details or endpoint configurations are still correct.
Upload Works, But No URL Is Copied
Enable Copy URL to clipboard under After upload tasks. Verify the destination provides a usable URL that ShareX can correctly process.
Screenshot Goes to the Wrong Destination
Open Destinationsand verify the selected image uploader. If a custom hotkey is in use, also check the destination override within that specific workflow's settings.
Copied Link Fails for Others
The destination might require login, block public access, use an expired link, or return an internal network address. Use a private browser window to test access and review the provider's settings.
Accidental Private Screenshot Upload
Immediately use the provider's deletion feature. Assume that cached copies or recipients might still retain access. Any credentials, tokens, or secrets visible in the screenshot should be rotated. If exposed information can be invalidated, don't rely solely on deleting the remote image.
Privacy Checklist
Before activating an automated screenshot upload process, confirm these points:
- You are aware of the specific destination and account being utilized.
- You understand if new links generated will be publicly accessible.
- You know how to remove uploaded content.
- Private browser tabs, notifications, tokens, names, and file paths are all excluded.
- Credentials are set up with appropriate permissions.
- The workflow has been tested using non-sensitive material.
- A hotkey for local-only saves remains available.
The ShareX application itself does not collect any user data. As theprivacy policyexplains, files are only sent to services that the user has chosen and configured. After this transfer, the uploaded file is governed by the selected service's policies and access controls.
Create a Deliberate Sharing Process
Begin by testing with non-sensitive content, maintain a hotkey for local saves only, and activate automatic uploads solely for the captures intended for sharing.
Download ShareX