ShareX Beginner's Guide for Windows Users
ShareX has hundreds of options. This guide covers only the parts a new Windows user needs on day one.
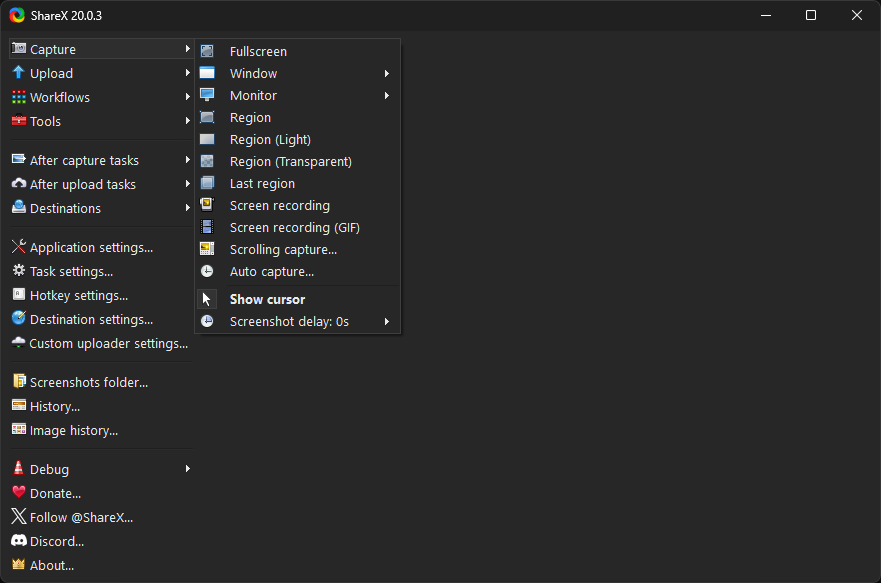
ShareX is a powerful, free, and open-source screen capture tool designed for Windows. It goes beyond simple screenshots, offering extensive features for image editing, recording, and sharing. This guide provides a clear path for new users to quickly get started with ShareX, understand its core capabilities, and configure it for immediate use. Whether you need to capture a specific region of your screen, record a short GIF, or annotate an image before sharing it, ShareX streamlines these tasks. This guide focuses on the most common uses and essential settings to help you harness its potential without feeling overwhelmed.
Who ShareX Is For
ShareX is ideal for Windows users who frequently need to capture, annotate, and share visual content from their screens. This includes developers showcasing bugs or features, technical writers creating documentation, educators preparing lesson materials, customer support representatives explaining solutions, or anyone who regularly communicates visually. Its robust feature set and customizable workflows make it particularly valuable for those who want more control and automation than basic built-in tools provide. If your current screenshot software feels limited, or you find yourself repeatedly performing the same post-capture actions, ShareX offers a significant upgrade in efficiency and capability.
The Six Features Beginners Use Most
ShareX offers a vast array of features, but new users typically gravitate towards a core set for their daily tasks. Focusing on these will help you become productive quickly.
1. Region Capture
This is the most common way to take a screenshot. It allows you to click and drag a rectangle over any part of your screen to capture precisely what you need. After initiating a region capture, you can fine-tune the selection with arrow keys or resize handles before confirming. It's perfect for capturing specific elements, code snippets, or sections of a document without including unnecessary background clutter.
2. Active Window Capture
Instead of manually drawing a region, this feature automatically captures the entire content of the currently focused window. It's excellent for capturing application interfaces or dialog boxes cleanly. ShareX intelligently detects the window boundaries, ensuring a perfect capture every time.
3. Screen Recording (GIF or MP4)
Beyond static images, ShareX can record video or animated GIFs of your screen activity. This is invaluable for demonstrating processes, showing UI interactions, or creating short tutorials. You can select a region to record, just like with image capture, and choose between various output formats and quality settings.
4. Image Editor and Annotation
Immediately after capturing an image, ShareX can open it in its built-in image editor. This powerful tool allows you to add arrows, text, shapes, highlights, watermarks, and more. Annotating screenshots helps convey information more clearly and precisely, making your visual communication more effective.
5. After Capture Tasks
ShareX's automation capabilities shine with After Capture Tasks. These are actions that automatically execute once a screenshot is taken. Common tasks include:
- **Open image editor:** Launch the captured image directly into the editor for annotation.
- **Copy image to clipboard:** Make the image available for pasting into other applications.
- **Save image to file:** Automatically save the image to a designated folder.
- **Upload image:** Send the image to a configured destination, like Imgur or a custom server.
These tasks can be combined to create efficient workflows. For example, you can capture, edit, copy to clipboard, and save to file all in one go.
6. Upload to Destination
ShareX integrates with numerous online services, allowing you to upload your captures directly. This is crucial for sharing screenshots quickly. Popular choices include Imgur, a file hosting service, or even your own custom FTP/SFTP server. Once uploaded, ShareX can automatically copy the URL to your clipboard, ready for pasting into chats, emails, or documents.
A Ten-Minute First-Time Setup
Getting ShareX ready for daily use involves a few quick steps to ensure it behaves as you expect.
- Download and Install: Visit the ShareX download page and download the installer. Run the installer and follow the on-screen prompts. The default settings are generally fine for most users.
- Launch ShareX: After installation, ShareX will typically launch automatically and place an icon in your system tray (near the clock). Double-click this icon to open the main ShareX window.
- Set Your Primary Hotkey:
- In the main window, click "Hotkey settings" on the left-hand menu.
- You'll see a list of hotkeys. The "Capture region" hotkey is usually the most important. By default, it's `Print Screen`.
- If you want to change it, click the "Edit" button next to "Capture region."
- Click the "None" button under "Hotkey" and then press your desired key combination (e.g., `Ctrl` + `Shift` + `C`).
- Click "OK" to save the hotkey.
- Configure After Capture Tasks:
- In the main window, click "After capture tasks" on the left-hand menu.
- For beginners, we recommend enabling:
- "Open image editor" (so you can annotate right away)
- "Copy image to clipboard" (for easy pasting)
- "Save image to file" (to keep a local copy)
- "Upload image" (for sharing online)
- You can disable "Show 'After capture tasks' window" if you prefer these actions to happen automatically without an extra prompt.
- Set Your Default File Destination:
- Click "Destinations" on the left-hand menu, then "Image uploader."
- For most users, "Imgur" is a good default as it's free and doesn't require an account for basic uploads. Select it from the dropdown.
- If you prefer to save locally only, you can disable "Upload image" in the "After capture tasks" and ensure "Save image to file" is enabled.
- Test Your Setup: Press your chosen hotkey (e.g., `Ctrl` + `Shift` + `C` or `Print Screen`). Draw a rectangle on your screen. The image editor should open, then the image should be copied to your clipboard, saved to your default folder (usually `Documents\ShareX\Screenshots`), and uploaded if you enabled that task.
Settings Worth Changing Right Away
While ShareX has many advanced options, a few settings can significantly improve your initial experience and workflow.
Output Folder
By default, ShareX saves screenshots to `Documents\ShareX\Screenshots`. If you prefer a different location:
- In the main window, click "Application settings" on the left-hand menu.
- Go to the "Path" tab.
- Click the "Browse" button next to "Screenshots folder" and select your desired directory.
Filename Pattern
The default filename includes the date and time, which is usually sufficient. However, you can customize this:
- In the main window, click "Task settings" on the left-hand menu.
- Go to the "Upload" tab.
- Under "Filename pattern," you can modify the pattern using variables (e.g., `{yyyymmdd_hhmmss}` for date and time, `{title}` for window title).
Image Quality
By default, ShareX uses a PNG format for screenshots, which is lossless and high quality. For smaller file sizes, especially when uploading, you might consider JPEG:
- Click "Task settings" on the left-hand menu.
- Go to the "Image" tab.
- Under "Image format," you can change "PNG" to "JPEG."
- If you choose JPEG, you can also adjust the "JPEG quality" slider (lower percentage means smaller file size but more compression artifacts).
Default After Upload Tasks
After an image is uploaded, ShareX can perform additional actions. It's highly recommended to enable:
- "Copy URL to clipboard": This is critical for sharing. Once your image is uploaded, its web link is immediately ready for pasting.
- "Show notification": Provides a visual confirmation that the upload was successful and the URL is copied.
To enable these:
- In the main window, click "After upload tasks" on the left-hand menu.
- Ensure "Copy URL to clipboard" and "Show notification" are checked.
Capture Cursor
Sometimes you want the mouse cursor to be visible in your screenshots, other times not.
- Click "Task settings" on the left-hand menu.
- Go to the "Capture" tab.
- Check or uncheck "Capture cursor" based on your preference.
You can learn more about these and other options in
capture settings explained.
Settings You Can Safely Ignore for Now
ShareX's depth can be intimidating. For a beginner, many settings are advanced or cater to very specific workflows. You can safely ignore these until you have a clear need for them.
- Custom Uploaders: While powerful for integrating with niche services or your own servers, stick with built-in options like Imgur or a file hoster like Google Photos or Dropbox initially.
- Workflows: This section allows you to create complex sequences of actions based on triggers. It's an advanced feature for highly customized automation.
- Image Effects: ShareX offers a dizzying array of image effects (e.g., watermarks, borders, shadows, pixelation, color manipulation). While fun, they are not essential for basic screenshot functionality. You can explore these once you're comfortable with the core features.
- OCR (Optical Character Recognition): This tool can extract text from images. It's useful in specific scenarios but not part of the everyday screenshot workflow for most users.
- Tools Menu: The "Tools" menu contains many utilities like a Color Picker, Ruler, QR Code Generator, Image Combiner, and Video Converter. These are excellent additions but are separate from the core screenshot and recording functions.
- Advanced Hotkey Settings: Beyond setting your primary capture hotkey, ShareX allows you to assign hotkeys to almost any action. For now, focus on your main capture hotkey.
- Application Settings > Integration: This tab deals with shell extension integration (right-click menu options) and other system-level integrations that aren't critical for initial use.
How to Learn the Rest Without Getting Lost
ShareX has a deep feature set. The best way to learn more without feeling overwhelmed is to explore incrementally and contextually.
1. Master the Basics First
Before diving into advanced features, ensure you're completely comfortable with the core actions: region capture, active window capture, simple recording, using the image editor for basic annotations, and understanding your After Capture/Upload Tasks. Consistent use of these will build your foundational knowledge. For a more detailed look at just screenshots, refer to
ShareX screenshot basics.
2. Explore Menus Incrementally
When you have a specific need, look for the feature. For example:
- "I need to record a GIF": Go to the "Capture" menu and look for "Screen recording (GIF)."
- "I want to blur sensitive information": Take a screenshot, open the image editor, and look for a "Pixelate" or "Blur" tool.
- "I want to upload to a different service": Check the "Destinations" menu.
3. Use the Main Window as Your Hub
The main ShareX window provides quick access to all major categories: "Capture," "Workflow," "Hotkey settings," "Task settings," "After capture tasks," "After upload tasks," "Destinations," "Tools," "Application settings," and "History." Spend a few minutes occasionally just clicking through these main categories to see what options are available. You don't need to understand every sub-setting, just recognize what's there.
4. Consult the Full Documentation
When you encounter a specific challenge or want to achieve something particular, refer to
the full ShareX walkthrough for Windows. This comprehensive guide details every feature and setting, allowing you to search for solutions to your exact needs.
5. Experiment Safely
ShareX won't break your system. Feel free to experiment with settings. If something doesn't work as expected, you can always revert to default settings or disable a feature you just tried. Take screenshots of your settings before making major changes if you're worried about losing your configuration. By focusing on your immediate needs and gradually exploring the software's capabilities, you'll naturally discover and integrate ShareX's advanced features into your workflow as you become more proficient.
Frequently Asked Questions
What is ShareX, and is it free?
ShareX is a free and open-source screen capture, file sharing, and productivity tool for Windows. It allows you to take screenshots, record video, annotate images, and upload files to various online services.
How do I take a basic screenshot with ShareX?
The easiest way is to use the "Capture region" hotkey, which is `Print Screen` by default. Press the hotkey, then click and drag your mouse to select the area you want to capture. Release the mouse button to finalize the screenshot.
Can ShareX record my screen?
Yes, ShareX can record your screen as a video (MP4) or an animated GIF. Go to the "Capture" menu, then select "Screen recording (GIF)" or "Screen recording (MP4)" to choose your recording area and begin.
Where does ShareX save my screenshots?
By default, ShareX saves your screenshots to the `Documents\ShareX\Screenshots` folder on your Windows computer. You can change this location in the "Application settings" under the "Path" tab.
How do I annotate a screenshot after taking it?
Ensure "Open image editor" is enabled in your "After capture tasks." After taking a screenshot, the ShareX image editor will automatically open, allowing you to add text, arrows, shapes, and other annotations before saving or uploading.
My screenshots aren't uploading. What should I do?
First, check your "After capture tasks" to ensure "Upload image" is enabled. Second, verify your "Destinations" settings, specifically your "Image uploader," to make sure a valid service like Imgur is selected and configured correctly.
Get ShareX for Windows
ShareX is free and open source. Install it, then come back and try the steps above.
Download ShareX