ShareX Screen Capture Explained
How the ShareX screen capture engine handles regions, windows, monitors, and multi-display desktops on Windows.
ShareX is a free and open-source screen capture tool for Windows that provides extensive options for capturing your screen. Whether you need to capture a specific area, an entire window, or record a video, ShareX offers a robust set of features to meet your needs. This guide will walk you through the various aspects of ShareX screen capture, helping you understand its capabilities and how to use them effectively.
What Counts as Screen Capture in ShareX
ShareX offers a wide array of methods under the umbrella of "screen capture." These methods are typically accessed from the main ShareX window's "Capture" menu or via custom hotkeys. The primary forms of ShareX screen capture include:
- Region: Allows you to define a custom rectangular area on your screen for capture. This is highly flexible for capturing specific parts of an application or desktop. You can learn more about this in the region capture documentation.
- Last Region: Re-captures the exact same area as your previous "Region" capture, useful for repetitive tasks.
- Window: Captures an entire active window, including its title bar and borders.
- Active Window: Captures the currently focused window without needing to select it manually.
- Active Window (Text): Attempts to capture the text content of the active window, rather than its visual representation.
- Monitor: Captures the entire content of a single selected monitor.
- Fullscreen: Captures all connected displays as one large image.
- Scrolling Capture: Captures the entire scrollable content of a window, such as a long webpage or document, even if it extends beyond the visible screen area.
- Screen Recording (GIF): Records a specific region or screen activity as an animated GIF file.
- Screen Recording (MP4/Custom): Records screen activity as a video file using FFmpeg, allowing for various video formats and codecs.
- OCR (Optical Character Recognition): Captures a region and then processes it to extract text from the image.
Each of these methods can be configured with specific behaviors and after-capture tasks, making ShareX a highly customizable ShareX desktop capture solution. For a detailed comparison of these options, refer to the
image capture modes comparedguide.
Region Capture vs Window Capture vs Desktop Capture
Understanding the differences between these core capture types is crucial for efficient use of ShareX.
Region Capture
Region capture is one of the most versatile methods. When you initiate a region capture (e.g., via the "Capture" menu > "Region" or a hotkey), your screen dims, and a crosshair appears. You can then:
- Click and drag to define a rectangular area.
- Hold `Ctrl` and scroll the mouse wheel to adjust the size of the selected region in increments.
- Hold `Shift` and click to snap the region to the boundaries of windows or UI elements.
- Press `Enter` or double-click to capture the selected region.
- Right-click or press `Esc` to cancel the capture.
This method is ideal for capturing specific elements, custom-sized areas, or parts of windows without including the entire window frame. ShareX also provides a magnified view around your cursor during region selection, aiding in precise pixel-level selection.
Window Capture
Window capture focuses on individual application windows.
- From the "Capture" menu, select "Window" or "Active Window."
- If you chose "Window," move your mouse over the desired window. ShareX will highlight the window with a colored border.
- Click the highlighted window to capture it.
This captures the entire visual content of the window, including its title bar, scroll bars, and borders. It's perfect when you need a clean shot of an application's interface without any desktop background or other window elements. The "Active Window" option bypasses the selection step and immediately captures the currently focused window.
Desktop Capture (Fullscreen/Monitor)
Desktop capture refers to capturing larger portions of your screen, typically entire monitors or all connected displays.
- Fullscreen: Selecting "Capture" > "Fullscreen" will immediately capture everything displayed across all your monitors as a single, stitched image. This is useful for demonstrating multi-monitor setups or when you need a broad overview of your entire workspace.
- Monitor: Selecting "Capture" > "Monitor" allows you to choose a specific monitor to capture. If you have multiple displays, ShareX will highlight each monitor as you hover over it. Click the desired monitor to capture its entire content. This is useful when you want to capture one screen without including content from other connected displays.
These methods are straightforward and do not require manual selection of areas, making them quick for broad captures.
Multi-Monitor and High-DPI Displays
ShareX handles multi-monitor setups and high-DPI (dots per inch) displays effectively, which is crucial for modern Windows environments.
Multi-Monitor Support
When using multiple monitors, ShareX provides specific options:
- Fullscreen: As mentioned, this captures all monitors as one continuous image. The resulting image will be a composite of all your displays arranged as they are on your desktop.
- Monitor: This allows you to select and capture a single monitor from your setup.
- Region Capture: You can define a region that spans across multiple monitors. ShareX will correctly capture the content from all involved displays within that region.
- Window Capture: If a window is partially or fully displayed on multiple monitors, ShareX will capture its entire content, regardless of which screen it resides on.
ShareX correctly identifies the boundaries and resolutions of each connected display, ensuring accurate captures across your entire desktop real estate.
High-DPI Scaling
Modern Windows PCs often use high-DPI displays, which scale the user interface to ensure text and elements are readable. ShareX is designed to work seamlessly with these scaling settings.
- When you perform a ShareX screen capture on a high-DPI display, it captures the content at its native resolution, not the scaled resolution. This means your captured images will be crisp and clear, reflecting the actual pixel data, not a scaled-down version.
- For example, if you have a 4K display set to 150% scaling, a fullscreen capture will be 3840x2160 pixels, not a smaller, scaled-down image.
If you encounter any issues with scaling (e.g., blurry captures or incorrect sizes), verify your display scaling settings in Windows (Settings > System > Display) and ensure ShareX is running with appropriate compatibility settings, though typically it handles this automatically.
Capture Delays, Cursors, and Transparency
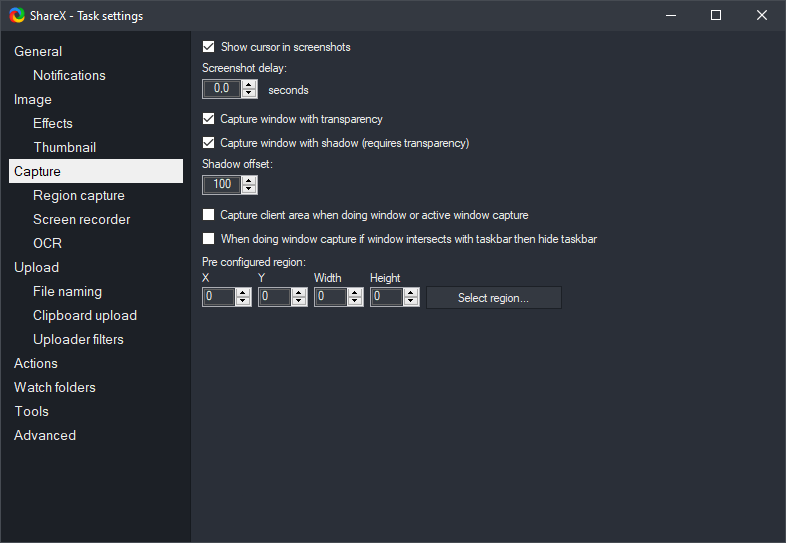
ShareX provides several options to fine-tune the behavior of your captures, particularly useful for specific scenarios like capturing menus or tooltips. These settings are found in "Task settings" > "Capture."
Capture Delay
A capture delay introduces a short pause between when you initiate a capture and when ShareX actually takes the screenshot. This is invaluable for:
- Capturing ephemeral elements: Menus that disappear when you move the mouse, tooltips, context menus, or timed pop-ups.
- Preparing the screen: Giving you a moment to open a specific menu or arrange windows before the capture occurs.
To set a capture delay:
- Open "Task settings" from the main ShareX window.
- Navigate to "Capture."
- Find the "Capture delay" option and enter the desired delay in milliseconds (e.g., 500 for half a second, 2000 for two seconds).
When a capture delay is active, ShareX will display a small countdown timer before taking the screenshot.
Include Cursor
By default, ShareX includes the mouse cursor in captures. You can toggle this behavior:
- Open "Task settings."
- Navigate to "Capture."
- Check or uncheck the "Include cursor" option.
Unchecking this is useful if you want clean screenshots of user interfaces without the distraction of the cursor.
Transparent Window Capture
ShareX can capture windows with transparency, such as those with semi-transparent borders or effects.
- Open "Task settings."
- Navigate to "Capture."
- Ensure "Transparent window capture" is enabled.
When enabled, ShareX will attempt to preserve the alpha channel (transparency) of windows. This is particularly noticeable when capturing windows with Aero Glass effects (on older Windows versions) or modern UWP apps with transparent elements. The captured image will typically be saved as a PNG to preserve the transparency.
Image Format and Quality Choices
ShareX offers extensive control over the output format and quality of your captured images, impacting file size, visual fidelity, and compatibility. These settings are primarily found in "Task settings" > "Image" > "Format."
Image Formats
You can select from several popular image formats for your captures:
- PNG (Portable Network Graphics): This is the default and recommended format for most screenshots. PNG is lossless, meaning it preserves all image data without compression artifacts, resulting in high-quality, sharp images. It also supports transparency (alpha channel), which is essential for capturing transparent window elements or for use in image editing. File sizes can be larger than JPG but are generally manageable for screenshots.
- JPG (Joint Photographic Experts Group): A lossy compression format, JPG is excellent for photographs and images with continuous tones. For screenshots with sharp lines, text, and flat colors, JPG can introduce noticeable compression artifacts (blockiness or fuzziness), especially at lower quality settings. However, it typically produces much smaller file sizes than PNG.
- GIF (Graphics Interchange Format): Primarily used for animated images, GIF also supports static images with a limited color palette (up to 256 colors). It's suitable for simple graphics or when you specifically need a GIF for compatibility reasons, but PNG is generally superior for static screenshots.
- BMP (Bitmap): An uncompressed format that produces very large file sizes. It's rarely used for screenshots due to its inefficiency but is available for specific legacy needs.
- TIFF (Tagged Image File Format): Supports both lossless and lossy compression, and can handle multiple layers. It's often used in professional printing and graphic design but is overkill for standard screenshots and results in large files.
- WebP: A modern image format developed by Google that offers both lossless and lossy compression, generally achieving smaller file sizes than PNG or JPG while maintaining similar quality. It supports transparency and is a good option for web-based sharing.
Quality Settings
For formats that support quality adjustment (like JPG and WebP), you can specify the compression level:
- Open "Task settings" from the main ShareX window.
- Navigate to "Image" > "Format."
- Select your desired image format (e.g., JPG).
- Adjust the "Image quality" slider. A higher percentage means less compression and better quality but a larger file size. A lower percentage means more compression and a smaller file size but potentially more artifacts.
For JPG, a quality setting between 80% and 90% often provides a good balance between file size and visual fidelity for general use. For WebP, similar quality ranges apply. PNG, being lossless, does not have a "quality" slider in the same sense, but ShareX might offer compression levels that affect file size without losing data.
Capturing Menus, Tooltips, and Fullscreen Games
Capturing dynamic or challenging elements requires specific techniques within ShareX.
Capturing Menus and Tooltips
Menus and tooltips are often transient; they disappear when you move your mouse or click elsewhere. To capture them reliably:
- Use Capture Delay: As detailed in the "Capture Delays" section, set a delay (e.g., 2-3 seconds) in "Task settings" > "Capture" > "Capture delay."
- Initiate Capture: Start your chosen capture method (e.g., "Region" or "Active Window").
- Trigger Menu/Tooltip: Quickly open the menu or hover over the element to make the tooltip appear.
- Wait for Delay: Keep the menu/tooltip visible until the capture delay countdown finishes and ShareX takes the screenshot.
This method ensures the desired element is present on screen when the actual capture occurs.
Capturing Fullscreen Games and Applications
Capturing fullscreen games or applications that run in exclusive fullscreen mode can be challenging for many screen capture tools. ShareX offers several approaches:
- Hotkey Capture: The most reliable method is to use a hotkey for "Fullscreen" or "Active Window" capture. Configure a hotkey in "Hotkey settings" for your preferred capture type. While in the game, press this hotkey. ShareX works by hooking into the graphics pipeline, which often allows it to capture content even from exclusive fullscreen applications.
- Screen Recording: For video capture of games, use the "Screen Recording (MP4/Custom)" option. ShareX leverages FFmpeg, which is often capable of recording fullscreen game content. Ensure FFmpeg is properly configured in "Task settings" > "Screen recorder" > "Screen recording options."
- Windowed Mode (if available): If the game or application supports windowed or borderless windowed mode, using one of these modes will make it behave like a standard desktop application, allowing any ShareX capture method (Region, Window, Active Window) to work without issues. This is often the easiest and most compatible approach.
If you encounter issues, try running ShareX as an administrator, as some games might restrict access to their display buffer without elevated privileges. Also, ensure your display drivers are up to date.
Frequently Asked Questions
How do I capture a long webpage that requires scrolling?
Use the "Scrolling Capture" feature. From the "Capture" menu, select "Scrolling Capture." ShareX will prompt you to select the window or scrollable area. Click on the desired window, and ShareX will automatically scroll and stitch together the content into one continuous image.
Can ShareX record my screen as a video or GIF?
Yes, ShareX supports both video and GIF recording. For video, use "Capture" > "Screen Recording (MP4/Custom)," which utilizes FFmpeg for high-quality video output. For animated GIFs, choose "Capture" > "Screen Recording (GIF)." Both options allow you to select a region or record the entire screen.
My captures are blurry or low quality. How can I fix this?
Check your image format and quality settings in "Task settings" > "Image" > "Format." Ensure you are using a lossless format like PNG, or if using JPG/WebP, set the "Image quality" slider to a higher percentage (e.g., 90-100%). Also, verify your display scaling settings in Windows; ShareX captures at native resolution, so high-DPI displays should produce crisp images.
How do I make ShareX automatically save screenshots without prompting me?
After a ShareX screen capture, actions are determined by "After capture tasks" and "After upload tasks." In the main ShareX window, go to "After capture tasks" and ensure "Save image to file" is checked. You can also configure the default save path in "Application settings" > "Paths."
Can I customize the hotkeys for different capture types?
Absolutely. Navigate to "Hotkey settings" from the main ShareX window. Here, you can define custom key combinations for almost every ShareX function, including all the various capture methods like "Region," "Active window," "Fullscreen," and "Screen recording." You can also chain multiple actions to a single hotkey.
Get ShareX for Windows
ShareX is free and open source. Install it, then come back and try the steps above.
Download ShareX