ShareX Screen Recording Not Working: What to Check
Most recording failures trace back to FFmpeg, the selected audio device, or a frame rate the machine cannot sustain.
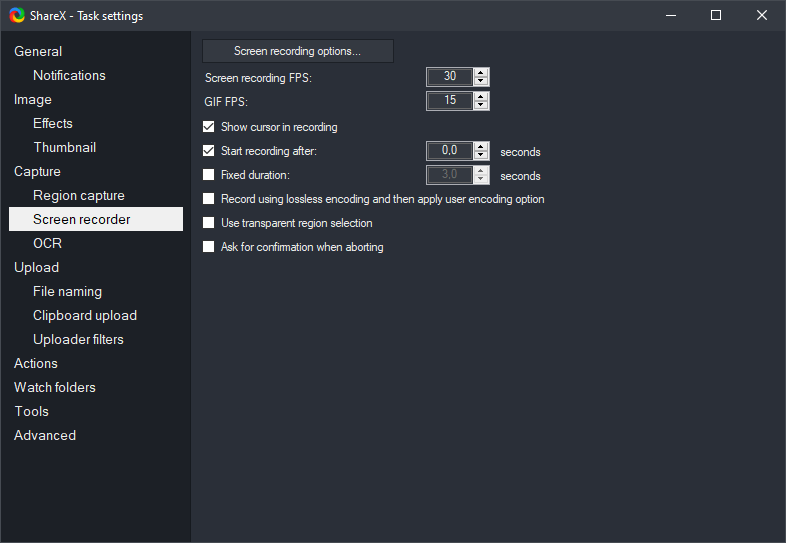
ShareX offers powerful screen recording capabilities, but sometimes users encounter issues where the screen recording doesn't work as expected. This guide helps you diagnose common problems and find solutions when your ShareX screen recorder isn't performing correctly. We'll cover everything from initial setup checks to specific video and audio issues, ensuring you can effectively capture your screen.
Confirm FFmpeg Is Installed and Found
ShareX relies on FFmpeg, a free and open-source collection of libraries and programs, to handle screen recording, GIF recording, and video conversion tasks. If FFmpeg is not installed or ShareX cannot locate it, your screen recording attempts will fail. To check and install FFmpeg:
- Open ShareX.
- From the main window, click on Task settings.
- In the Task settings window, navigate to Screen recorder.
- Click the Screen recorder options... button.
- In the "Screen recording options" window, look for the "FFmpeg path" section.
- If FFmpeg is not installed, you will see a button labeled Download. Click this button. ShareX will download the necessary FFmpeg files and place them in the correct location.
- If FFmpeg is already installed but ShareX isn't finding it, the path might be incorrect. You can manually specify the path by clicking the ... button next to the FFmpeg path field and browsing to the folder where
ffmpeg.exeis located. Typically, ShareX manages this automatically after a download.
After installing or confirming the FFmpeg path, try a test recording. If issues persist, continue to the next sections.
Recording Starts Then Stops Immediately
If you initiate a screen recording and it immediately stops without producing a file, or produces a very small, unplayable file, it often points to an FFmpeg configuration problem or a permissions issue. Here's what to check:
- FFmpeg Installation: Re-verify that FFmpeg is correctly installed and its path is set in Task settings > Screen recorder > Screen recorder options... as described in the previous section. An incomplete or corrupted FFmpeg download can cause this.
- Required Codecs/Libraries: While ShareX usually bundles everything needed, ensure no antivirus or security software is preventing FFmpeg from accessing necessary system resources or writing temporary files.
- Output Folder Permissions: ShareX needs write access to the folder where it saves recordings.
- Go to Application settings > Path.
- Note the "Custom screenshots folder" path. This is usually where recordings are saved by default.
- Navigate to this folder in Windows File Explorer. Right-click on the folder, select Properties, go to the Security tab, and ensure your user account has "Full control" or at least "Write" permissions. If not, you may need to change the folder or adjust permissions.
- Temporary Files: FFmpeg uses a temporary directory during recording. If this directory is full or inaccessible, it can cause immediate stops. ShareX's temporary directory is usually within your user's AppData folder. You can try clearing temporary files on your system.
- Corrupted Configuration: Rarely, ShareX's configuration files can become corrupted. As a last resort for this specific symptom, you could try resetting ShareX settings (Application settings > Advanced > Reset application settings), but be aware this will revert all your customizations.
Video Is Black or Shows the Wrong Region
A black screen, a frozen image, or recording the wrong monitor or area are common issues with screen recording. This typically relates to display settings, graphics drivers, or incorrect capture region selection.
Black Screen or Frozen Image
If your recording results in a black video, or a single frozen frame, consider these points:
- Hardware Acceleration: Some applications or games use hardware acceleration which can interfere with screen recording. Try disabling hardware acceleration within the application you are trying to record, if possible.
- Graphics Drivers: Outdated or corrupted graphics drivers are a frequent cause of black screen issues. Ensure your graphics drivers are up to date by visiting your graphics card manufacturer's website (NVIDIA, AMD, Intel).
- Display Mode: Recording certain full-screen exclusive applications (like some games) can be problematic. Try recording them in windowed or borderless windowed mode if available.
- Multi-GPU Setups: If you have a laptop with integrated and dedicated graphics, ensure ShareX (and FFmpeg) is using the correct GPU for recording. You can often configure this in your graphics card's control panel.
Wrong Region or Monitor Recorded
If ShareX records the wrong screen or an unexpected portion of your desktop:
- Capture Region Selection:
- When you initiate a screen recording (e.g., via Capture > Screen recording), ShareX prompts you to select the area. Make sure you are accurately dragging your mouse to select the desired region, or clicking on the specific monitor if you have multiple.
- For specific window capture, use Capture > Screen recording (GIF) > Active window or Window list.
- Primary Monitor Setting: In a multi-monitor setup, Windows designates a primary monitor. Ensure ShareX is set to record the correct display. You can verify your display arrangement in Windows Settings > System > Display.
- Monitor Scaling: Inconsistent display scaling across multiple monitors can sometimes confuse capture tools. Try setting all displays to the same scaling percentage (e.g., 100% or 125%) temporarily for troubleshooting.
- Task Settings: Review your recording settings in detail under Task settings > Screen recorder. Ensure the correct "Source" (e.g., "GDIGrab" or "Desktop Duplication API") is selected if you're experiencing issues, although "Auto" usually works best.
No Audio in the Finished Clip
Missing audio is a common complaint. It's usually due to incorrect audio input device selection or system audio settings. Here’s how to troubleshoot audio issues:
- Check ShareX Audio Source:
- Open Task settings.
- Go to Screen recorder.
- Click Screen recorder options....
- Under the "Audio source" section, ensure the correct device is selected.
- To record system audio (sounds playing on your computer), select "Stereo Mix," "What U Hear," or a similar "loopback" device provided by your sound card. If you don't see one, your sound card might not support it, or it may be disabled.
- To record from your microphone, select your microphone from the dropdown list.
- You can select both a system audio device and a microphone to record both simultaneously.
- Enable Stereo Mix (if applicable):
- Right-click the speaker icon in your Windows taskbar and select Sound settings.
- In the Sound settings, click More sound settings under "Related Settings" to open the classic Sound Control Panel.
- Go to the Recording tab.
- Right-click in an empty area and ensure "Show Disabled Devices" and "Show Disconnected Devices" are checked.
- If "Stereo Mix" or "What U Hear" appears, right-click it and select Enable, then set it as the Default Device.
- System Volume Levels: Ensure the volume for the application you're recording is not muted or set too low in Windows' Volume Mixer. Right-click the speaker icon, then select Open Sound settings, and check "App volume and device preferences".
- Microphone Permissions: If you're using a microphone, ensure Windows privacy settings allow ShareX to access your microphone. Go to Windows Settings > Privacy & security > Microphone and ensure "Microphone access" is on, and ShareX is allowed to access it.
- Audio Driver Issues: Update your audio drivers. Outdated drivers can cause recording malfunctions.
Remember that some audio devices might not be compatible with simultaneous playback and recording of "Stereo Mix" on older hardware.
Choppy or Dropped Frames
Choppy video or dropped frames indicate that your system is struggling to keep up with the demands of recording. This is often a performance issue related to CPU, GPU, or disk speed. To improve recording smoothness:
- Reduce Recording Resolution/Frame Rate:
- Go to Task settings > Screen recorder > Screen recorder options....
- Lower the "Framerate (FPS)" value (e.g., from 60 to 30).
- Reduce the "Video source" resolution. Instead of "Full screen", select "Region" and capture a smaller area, or use "Custom region" and manually define a smaller capture box.
- Change Video Codec:
- In Task settings > Screen recorder > Screen recorder options..., experiment with different "Video codec" options.
H.264 / x264is a good general-purpose codec.- If your graphics card supports hardware encoding (NVIDIA NVENC, AMD AMF, Intel Quick Sync), selecting a hardware-accelerated codec (e.g.,
H.264 / NVENCorH.265 / NVENCif available) can significantly offload the CPU and improve performance. VP8orVP9are good options for GIFs but can be CPU-intensive for video.
- Increase Constant Rate Factor (CRF): A higher CRF value (e.g., 28-32) results in a smaller file size and less CPU usage, but lower quality. A lower CRF (e.g., 18-23) means higher quality but larger files and more CPU. Find a balance under Task settings > Screen recorder > Screen recorder options... > Configure video encoder settings....
- Disk Speed: Ensure you are saving recordings to a fast drive, preferably an SSD. Recording to a slow HDD, especially if it's also the system drive, can cause bottlenecks.
- Close Background Applications: Minimize other CPU and GPU intensive applications while recording.
- Processor and Memory: Ensure your computer meets the minimum requirements for recording, especially for high resolutions and frame rates. Close unnecessary background processes.
- "Desktop Duplication API" Source: In Task settings > Screen recorder > Screen recorder options..., try switching the "Video source" from "GDIGrab" to "Desktop Duplication API" or vice-versa. "Desktop Duplication API" is generally more efficient for modern systems but can have compatibility issues with older drivers or specific hardware.
More details about these settings can be found in
recording settings in detail.
Output File Is Missing or Enormous
After recording, you might find no file, or a file that is excessively large.
Output File Missing
If your recording completes but no file appears:
- Check Output Directory:
- Go to Application settings > Path.
- Verify the "Custom screenshots folder" path. This is the default location for recordings.
- Ensure the path is valid and accessible.
- After Capture Tasks: Check your After capture tasks. If you have "Delete file" enabled after an upload task, and the upload fails, the file might be deleted. Temporarily disable "Delete file" for testing.
- FFmpeg Errors: Sometimes FFmpeg fails to finalize the file. Check the ShareX log for FFmpeg errors (ShareX main window > Log). Look for messages related to FFmpeg failing to write the output.
- Antivirus Interference: Your antivirus software might be quarantining or deleting the file if it falsely identifies it as malicious. Check your antivirus quarantine.
Enormous File Size
Large file sizes are typically due to high quality settings or inefficient codecs.
- Video Codec and Quality:
- As mentioned in the "Choppy or Dropped Frames" section, the chosen video codec and quality settings significantly impact file size.
- Under Task settings > Screen recorder > Screen recorder options..., select a more efficient codec like
H.264 / x264or a hardware-accelerated H.264/H.265 option if available. - Adjust the "Constant Rate Factor (CRF)" (higher CRF = smaller file, lower quality).
- Framerate and Resolution: Recording at very high frame rates (e.g., 60 FPS) and high resolutions (e.g., 4K) will naturally produce large files. Reduce these if file size is a concern.
- Audio Bitrate: While less impactful than video, a very high audio bitrate can add to file size. You can adjust this in Screen recorder options... > Configure audio encoder settings....
- Output Format: Ensure you are saving to a compressed format like MP4 or WebM. Uncompressed formats would produce extremely large files. ShareX defaults to MP4, which is generally efficient.
A Ten-Second Test That Isolates the Cause
When troubleshooting, it's helpful to isolate variables. This test helps determine if the issue is with the capture itself or the encoding process.
- Set Output to Uncompressed:
- Open Task settings > Screen recorder > Screen recorder options....
- Under "Video source", choose a small, fixed region (e.g., 640x480).
- Under "Video codec", select
MPEG-4 (uncompressed)orRaw videoif available. If not, choose a lossless codec likeFFV1. - Set "Framerate (FPS)" to 10 or 15.
- Ensure "Audio source" is set to "None".
- Record a Simple Area: Start a screen recording of a static, simple area of your desktop (e.g., an empty part of the desktop background). Let it run for 10 seconds.
- Check the Output:
- If a file is created and plays smoothly (even if huge): This suggests FFmpeg is correctly capturing frames, but your original issue was likely related to encoding settings (codec, quality, resolution, frame rate) or disk speed. Revert the codec to H.264 and adjust quality settings.
- If no file is created, or it's a tiny, unplayable file: This indicates a more fundamental problem, such as FFmpeg not being found, permissions issues, or a severe graphics driver problem preventing frame capture. Revisit "Confirm FFmpeg Is Installed and Found" and "Recording Starts Then Stops Immediately" sections.
- If the video is black or corrupted: This points to issues with the video source itself, likely related to graphics drivers, hardware acceleration, or the "Video source" setting (GDIGrab vs. Desktop Duplication API). Review "Video Is Black or Shows the Wrong Region".
This test helps narrow down whether the problem lies in the initial capture phase or the subsequent compression and saving phase.
Frequently Asked Questions
Why does ShareX only record a black screen?
A black screen usually indicates an issue with your graphics drivers, hardware acceleration settings in the application being recorded, or conflicts with the display mode. Try updating your graphics drivers, disabling hardware acceleration in the target application, or switching the video source (GDIGrab/Desktop Duplication API) in ShareX's screen recorder options.
How do I fix ShareX screen recording stopping immediately?
This often points to a problem with FFmpeg installation or permissions. Ensure FFmpeg is correctly downloaded and configured in ShareX's Task settings, and verify that ShareX has write permissions to its output folder. Antivirus software can also interfere, so check its logs.
Why is there no sound in my ShareX recording?
No audio typically means the wrong audio source is selected in ShareX's screen recorder options, or the necessary "Stereo Mix" device is disabled in Windows Sound settings. Enable "Stereo Mix" or select your microphone, and ensure system volume levels are adequate.
How can I reduce the file size of ShareX screen recordings?
To reduce file size, adjust your video codec, quality (CRF), resolution, and frame rate settings in ShareX's screen recorder options. Using efficient codecs like H.264 and a higher CRF value will significantly decrease file size at the cost of some quality.
My ShareX recording is choppy, what should I do?
Choppy recordings are often due to performance bottlenecks. Reduce the recording resolution and frame rate, switch to a hardware-accelerated video codec if your system supports it, close unnecessary background applications, and ensure you're saving to a fast storage drive.
Get ShareX for Windows
ShareX is free and open source. Install it, then come back and try the steps above.
Download ShareX