ShareX Screenshot Not Working: Fixes to Try
Work through these checks in order when a ShareX capture produces nothing, a black frame, or the wrong area.
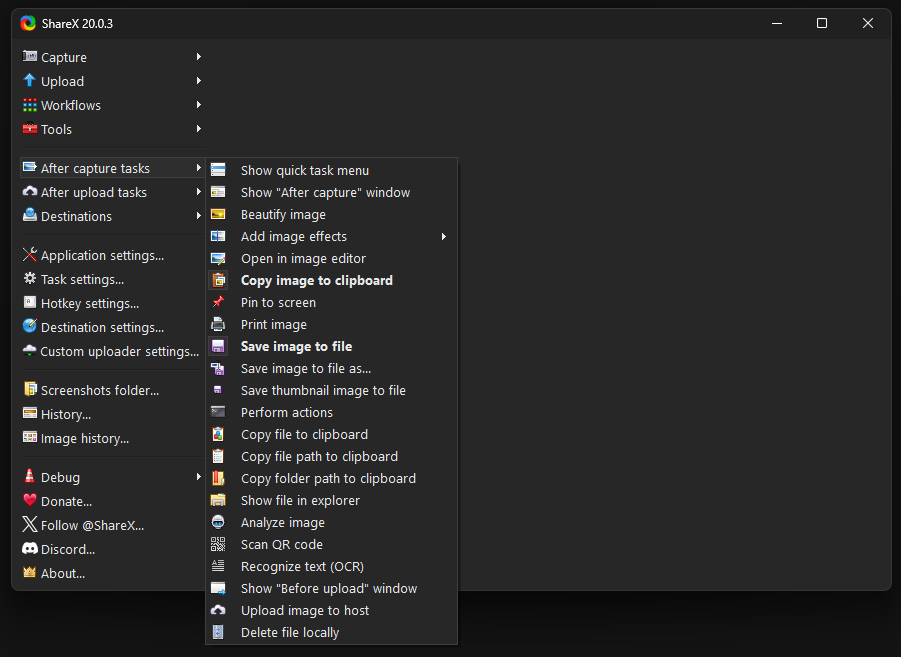
When you're trying to capture your screen with ShareX and it's not working as expected, it can be frustrating. This guide covers common scenarios where ShareX screenshots might fail, providing specific troubleshooting steps to get your capture tools back in working order. We’ll address issues like black or empty captures, problems with saving, incorrect capture areas, and conflicts with other applications.
Before diving into specific problems, always ensure ShareX is running. Look for its icon in your system tray (bottom-right corner of your desktop, near the clock). If it's not there, launch ShareX from your Start menu.
Start With the Task List in the Main Window
ShareX maintains a detailed log of every action it performs, including capture attempts, uploads, and image processing. This log is invaluable for diagnosing why a ShareX screenshot might not be working.
- Open the main ShareX window.
- Look for the large panel on the right side, labeled "Task list". This panel displays a chronological list of all recent tasks.
- If you just attempted a capture that failed, the most recent entry in this list should correspond to that attempt.
- Examine the "Status" column for the task. Common status messages indicating a problem might include "Failed", "Error", or specific error codes.
- Select the problematic task in the list. More detailed information, including error messages or reasons for failure, often appears in the "Details" panel below the task list, or sometimes in a pop-up dialog.
- Pay attention to any red text or icons, which typically signal an issue. For instance, if an upload failed, it might specify a network error or an authentication problem with your chosen destination. If the capture itself failed, it might indicate a permission issue or a conflict.
Understanding the error message here is the first step to finding a solution. For example, if it says "Failed to save image to disk," you might have a permissions issue with your save folder, or the disk might be full.
Captures That Come Out Black or Empty
A common issue is performing a ShareX capture screen action only to find the resulting image is entirely black or appears empty. This can happen for several reasons, often related to graphics hardware, permissions, or how certain applications are rendered on Windows.
- Check for Hardware Acceleration Conflicts: Some applications use hardware acceleration that can interfere with screen capture tools.
- Go to "Application settings" in the main ShareX window, then select "Advanced."
- Look for an option related to "Display capturing method" or "Capture method." Experiment with different options if available, such as "GDI" (Graphics Device Interface) or "DirectX" or "Windows.Graphics.Capture." Restart ShareX after changing this setting.
- If you are trying to capture a specific application (e.g., a video player, game, or browser with protected content), try disabling hardware acceleration within that application's settings.
- Administrator Privileges: If you are trying to capture an application running with elevated administrator privileges, ShareX may also need to run as an administrator to capture its content.
- Close ShareX.
- Right-click on the ShareX shortcut or executable (
ShareX.exe). - Select "Run as administrator."
- Attempt the capture again.
- Protected Content: Some applications, especially those streaming copyrighted video content (e.g., Netflix, Hulu, or certain media players), use Digital Rights Management (DRM) which can actively block screen capture attempts. In these cases, the capture will often result in a black screen. There is no workaround within ShareX for DRM-protected content.
- Multiple Monitors and Display Drivers: If you have multiple monitors or recently updated your display drivers, this can sometimes cause issues.
- Ensure your display drivers are up to date.
- Try capturing on a different monitor if you have more than one.
- Specific Capture Region Issues: If you're using a specific capture mode like "Window" or "Region," ensure the area you're trying to capture is actually visible and not obscured by other windows.
If the issue persists, review your capture settings reference for any unusual configurations that might be contributing to the problem.
Screenshots That Are Never Saved
You've taken a ShareX screenshot, but you can't find the file anywhere. This usually points to an issue with file paths, permissions, or after-capture tasks.
- Check Default Save Location:
- Open the main ShareX window.
- Go to "Application settings" > "Paths."
- The "Screenshots folder" field shows where ShareX attempts to save your images by default. Navigate to this folder in File Explorer to see if your capture is there.
- Ensure the "Use custom screenshots folder" option is checked if you've specified a non-default location.
- Folder Permissions: If ShareX doesn't have write permissions to the specified screenshots folder, it won't be able to save files.
- Right-click on your screenshots folder in File Explorer and select "Properties."
- Go to the "Security" tab and ensure your user account has "Write" permissions.
- If necessary, try changing the screenshots folder to a location within your user profile (e.g., your "Pictures" folder) where permissions are typically less restrictive.
- Running ShareX as an administrator (as described in the previous section) can sometimes bypass permission issues, but it's better to fix the underlying folder permissions.
- After-Capture Tasks: ShareX has powerful "After capture tasks" that can modify or prevent local saving.
- In the main ShareX window, check the "After capture tasks" menu.
- Ensure "Save image to file" is checked if you want the image saved locally. If it's unchecked, ShareX will not save the image to your computer, even if it performs other actions like uploading it.
- Also, check "Delete file after upload" if you're uploading. If this is enabled, the image will be saved temporarily and then removed after a successful upload. This might give the impression it was never saved.
- If you have "Perform actions" enabled, check the "Actions" list under "Task settings" > "Actions" to ensure no action is deleting the file or preventing its save.
- Disk Space: Verify that the drive where your screenshots folder is located has sufficient free space. If the disk is full, ShareX cannot save new files.
- Antivirus/Security Software: Occasionally, overzealous antivirus or security software can block ShareX from writing files to disk, mistaking it for malicious behavior. Check your security software's logs for any blocked actions related to ShareX.
For more details on how ShareX handles files after a capture, refer to the settings map, specifically the sections on "Application settings" and "Task settings."
The Wrong Area or Monitor Was Captured
You intended to capture a specific window or region, but ShareX captured the entire screen, a different monitor, or an incorrect area. This usually comes down to hotkey configuration or display settings.
- Review Hotkey Settings: Each capture method in ShareX is typically assigned a unique hotkey.
- Open the main ShareX window.
- Go to "Hotkey settings."
- Examine the hotkeys listed. For example, if you want to capture a "Region," ensure the hotkey assigned to "Capture region" is what you are pressing, and not the hotkey for "Capture fullscreen."
- If you're using a custom hotkey workflow, double-check that the "Task" assigned to the hotkey is the one you intend (e.g., "Capture region" vs. "Capture active window").
- If you suspect your hotkeys that do nothing, ensure no other application is globally overriding them.
- Monitor Selection (Multi-Monitor Setups):
- When using "Capture region" or "Capture window," ShareX typically allows you to select the monitor by moving your mouse. Ensure your mouse cursor is on the correct monitor before initiating the capture.
- For "Capture active window," ensure the window you want to capture is actually the active, focused window before pressing the hotkey.
- If you're using "Capture monitor," ShareX will typically capture the primary monitor or the one your mouse is currently on. There's no direct setting to force a specific monitor for a generic "Capture monitor" hotkey without a custom workflow.
- DPI Scaling Issues: High-DPI displays or different DPI scaling settings across multiple monitors can sometimes confuse capture tools, leading to incorrect capture areas or offsets.
- Right-click on your desktop and go to "Display settings."
- Check the "Scale and layout" settings for each monitor. If they are different, try setting them all to the same scaling percentage (e.g., 100% or 125%) temporarily to see if the issue resolves.
- In "Application settings" > "Advanced" in ShareX, you might find options related to DPI awareness or scaling compatibility. Experiment with these if available.
- Window Snapping/Resizing: If you're capturing a window that is in the process of being resized or snapped to a screen edge, the capture might occur before the window has settled into its final dimensions. Ensure the window is stable before attempting to capture it.
For a refresher on how to initiate various captures, review the screenshot basics guide.
Overlay Never Appears
When you initiate a capture, especially for "Region" or "Active window," ShareX typically displays a crosshair, a selection rectangle, or highlights the target window. If this visual overlay doesn't appear, you might be stuck without knowing what to select.
- Check "Show cursor" and "Show region selector" settings:
- In the main ShareX window, go to "Task settings" > "Capture."
- Ensure "Show cursor" is checked if you want to see your mouse cursor during region selection.
- For region captures, ensure that the overlay itself is not disabled. While there isn't a direct "Disable overlay" checkbox, certain capture settings or conflicts can prevent it from showing.
- Background Processes and Focus:
- Sometimes, another application might steal focus immediately after you press the hotkey, preventing ShareX's overlay from appearing on top. Try closing unnecessary background applications.
- If you have multiple monitors, ensure your mouse cursor is on the correct screen where you expect the overlay to appear.
- Graphics Driver Issues: Outdated or corrupted graphics drivers can cause display issues, including problems with overlays. Update your display drivers directly from your graphics card manufacturer's website (NVIDIA, AMD, Intel).
- Administrator Privileges: As mentioned before, if the application you're trying to capture is running with elevated privileges, ShareX might need to run as administrator to draw its overlay on top of it.
- Full Screen Applications/Games: Some full-screen games or applications that take exclusive control of the display might prevent ShareX's overlay from appearing. In such cases, switching the game to "Windowed Fullscreen" or "Borderless Window" mode often resolves the issue.
- Accessibility Features: Windows accessibility features or third-party screen readers can sometimes interfere with overlay drawing. Try temporarily disabling any such software.
If the overlay partially appears or is distorted, it might indicate a more complex graphics driver or display scaling issue. Reinstalling display drivers cleanly can sometimes help.
Conflicts With Other Capture Software
Running multiple screen capture, screenshot, or screen recording applications simultaneously can lead to conflicts, causing ShareX screenshots to fail or behave unpredictably. These conflicts often involve shared system resources, hotkeys, or display hooks.
- Identify Competing Software:
- Think about any other applications that might have screen capture capabilities. Common examples include:
- The built-in Windows Snipping Tool or Snip & Sketch
- Xbox Game Bar (Windows Key + G)
- NVIDIA GeForce Experience (ShadowPlay)
- AMD Radeon Software
- Cloud storage services with screenshot features (e.g., OneDrive, Dropbox)
- Other third-party screenshot tools (e.g., Lightshot, Greenshot)
- Video conferencing software (e.g., Zoom, Microsoft Teams) that might have active screen sharing hooks.
- Think about any other applications that might have screen capture capabilities. Common examples include:
- Temporarily Disable or Exit Competing Software:
- Close all other potential screen capture applications. Check your system tray for icons of such software and right-click to exit them.
- For Windows built-in tools like Game Bar, you can disable its screen recording features in Windows Settings: "Settings" > "Gaming" > "Xbox Game Bar" (toggle off) and "Captures" (toggle off "Record what happened").
- For graphics card utilities, open their respective control panels and disable any overlay or instant replay features.
- Check for Hotkey Overlaps:
- Even if you're not actively using another capture tool, if it has a global hotkey assigned that conflicts with a ShareX hotkey, it can intercept the command before ShareX receives it.
- Review the hotkey settings of all potential conflicting applications and ShareX's "Hotkey settings." Change ShareX hotkeys to unique combinations if necessary.
- Restart ShareX: After disabling or exiting conflicting software, restart ShareX to ensure it can properly initialize its capture hooks without interference.
It's generally best practice to only run one primary screen capture utility at a time to avoid these types of conflicts. If you must use multiple, ensure their hotkeys are distinct and consider disabling features in one while actively using the other.
Resetting to a Known-Good State
If you've tried all the specific troubleshooting steps and ShareX is still not working correctly, or if you've made many configuration changes and aren't sure what might be causing the problem, resetting ShareX to its default settings can often resolve complex issues. This effectively gives you a clean slate.
- Backup Your Settings (Optional but Recommended): If you have custom hotkeys, destinations, or other settings you want to preserve, you can back them up.
- Open the main ShareX window.
- Go to "Application settings" > "Backup."
- Click "Create backup" and save the
.sxcufile to a safe location.
- Reset Application Settings:
- In the main ShareX window, go to "Application settings" > "Advanced."
- Scroll down and find the "Reset all application settings" button.
- Click this button. ShareX will ask for confirmation. Confirm to proceed.
- This will reset all settings under "Application settings" to their default values.
- Reset Task Settings:
- In the main ShareX window, go to "Task settings."
- At the bottom of the "Task settings" panel, click the "Reset all task settings" button.
- Confirm the reset. This will revert all capture, after-capture, after-upload, and other task-related settings to defaults.
- Reset Hotkey Settings:
- In the main ShareX window, go to "Hotkey settings."
- Click the "Reset all hotkey settings" button.
- Confirm the reset. This will remove any custom hotkeys you've set and revert to the default hotkey assignments.
- Restart ShareX: After performing all desired resets, close and restart ShareX to ensure all changes are fully applied.
- Test Capture: Attempt a basic capture, such as "Capture region," to see if the issue is resolved with the default configuration.
- Restore Backup (If Applicable): If the issue is resolved and you backed up your settings, you can now try restoring them from the
.sxcufile via "Application settings" > "Backup" > "Restore backup." If the problem reappears after restoring, then one of your custom settings was likely the cause. You'll then need to reconfigure your settings manually, testing after each major change to pinpoint the culprit.
Resetting settings is a powerful troubleshooting step that often resolves issues caused by obscure or conflicting configurations that are difficult to track down individually.
Frequently Asked Questions
Why do my screenshots come out black on certain applications?
This often happens when an application uses hardware acceleration or Digital Rights Management (DRM) to protect content. Try disabling hardware acceleration in the problematic application's settings, or run ShareX as an administrator. DRM-protected content cannot be captured by design.
ShareX says it saved the screenshot, but I can't find it. What's wrong?
Check your default screenshots folder in "Application settings" > "Paths." Ensure ShareX has write permissions to that folder. Also, verify that "Save image to file" is checked under "After capture tasks" and that "Delete file after upload" isn't enabled if you want to keep local copies.
My hotkeys aren't working at all, or they're doing the wrong thing.
Go to "Hotkey settings" and verify the hotkeys are assigned correctly for your desired actions. Conflicts with other software's global hotkeys are a common cause; temporarily close other screen capture or overlay applications to check for interference. Resetting hotkeys to default can also help.
The capture overlay (crosshair, selection box) doesn't appear when I press a hotkey.
Ensure ShareX is running as an administrator, especially if you're trying to capture an application with elevated privileges. Update your graphics drivers, as display overlays can be affected by driver issues. Also, check for conflicts with other running applications that might be grabbing focus or interfering with display hooks.
Get ShareX for Windows
ShareX is free and open source. Install it, then come back and try the steps above.
Download ShareX