ShareX Upload Not Working: Practical Fixes
Upload failures show up in the task list first. Reading that row tells you which fix applies.
When ShareX completes a task like capturing your screen or recording a GIF, it automatically attempts to upload the resulting file to a configured destination. If you find that your ShareX upload is not working as expected, leading to missing links or inaccessible files, several common issues could be at play. This guide will walk you through systematic troubleshooting steps to diagnose and resolve these problems, ensuring your files are uploaded successfully. ShareX provides robust
upload settings and destinationsfor various services, but sometimes configuration errors, network issues, or service changes can disrupt the upload process. By carefully examining ShareX's feedback and your settings, you can pinpoint the cause and get your automatic uploads back on track.
Read the Upload Row in the Task List
When an upload fails, ShareX typically provides information within its main window. The "Task list" pane, usually located on the left side of the main ShareX window, displays a history of all completed tasks, including captures, recordings, and uploads.
Locate the Failed Task
- Open the main ShareX window.
- In the "Task list" pane, find the entry corresponding to the upload that failed. This will usually be the most recent capture or recording you attempted to upload.
- Look for a red exclamation mark icon next to the task, or text indicating an upload failure. The status column might also show "Failed" or "Error."
Examine the Error Message
When you select a failed task in the "Task list," the "Details" pane (often on the right side) will populate with more specific information. This pane is crucial for troubleshooting ShareX upload not working issues.
Within the "Details" pane, look for an "Upload information" section or similar. ShareX attempts to relay the error message directly from the upload destination. This message could be:
- "The remote server returned an error: (401) Unauthorized." This suggests an authentication problem. Your credentials (username, password, API key, token) are likely incorrect or expired for the selected destination.
- "The remote server returned an error: (403) Forbidden." Similar to 401, but could also indicate that your account lacks the necessary permissions to upload to the specified location, or that the destination service has blocked your IP address or account.
- "The remote server returned an error: (404) Not Found." This is less common for uploads but could mean the specified upload path or bucket does not exist on the destination server.
- "The remote server returned an error: (5xx) Server Error." A 500-level error indicates an issue on the destination server itself. This might be temporary, or it could signal a service outage.
- "Could not connect to the remote server." This points to a network connectivity issue between your computer and the upload destination. Firewall, proxy settings, or general internet problems could be the cause.
- "File size limit exceeded." Some destinations have restrictions on the maximum file size you can upload. Check the limits of your chosen service.
- Specific error messages from services: For instance, an image host might say "Invalid API key" or "Account quota exceeded."
Understanding these error messages is the first and most critical step in resolving why your ShareX upload is not working. Once you know the specific error, you can move on to addressing its root cause.
No Link Reached the Clipboard
A common symptom of a failed upload, or an upload that completed but didn't provide a usable link, is that nothing appears in your clipboard after the task finishes. ShareX is configured by default to copy the uploaded file's URL to the clipboard. If this isn't happening, it could be due to an upload failure, a misconfigured destination, or an issue with ShareX's after-upload tasks.
Verify After-Upload Tasks
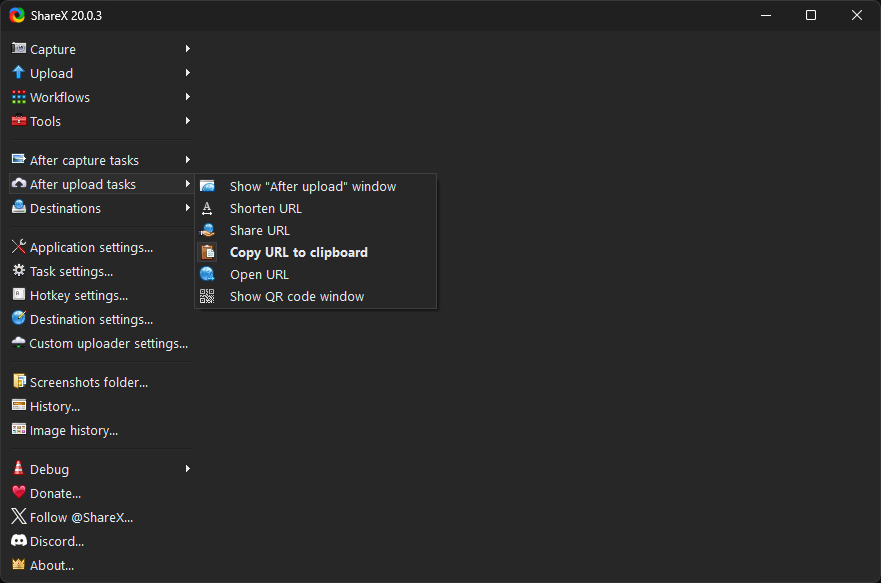
Even if an upload succeeds, if the "Copy URL to clipboard" after-upload task is not enabled, you won't get a link.
- In the main ShareX window, click on "After upload tasks" in the left-hand menu.
- Ensure that "Copy URL to clipboard" is checked. If it's unchecked, ShareX will upload the file but will not place the link in your clipboard.
- Also, check other "After upload tasks" that might interfere, such as "Delete file" if you're expecting the file to remain local for further processing.
Check Link Format and Destination Response
Sometimes, an upload destination might return an unexpected response, or the URL it provides isn't in a format ShareX expects.
- For custom uploaders: If you are using a custom uploader documentation, carefully review your script or configuration. The "URL regex" or "URL JSON path" must correctly extract the public URL from the destination's response. If this is incorrect, ShareX won't be able to find the URL to copy. Test your custom uploader with a simple file and examine the raw response from the server using a network debugging tool if necessary.
- For built-in destinations: If you're using a standard destination (e.g., Imgur, Gfycat, Dropbox), the issue is less likely to be with ShareX's parsing of the URL and more likely with the upload itself failing, or the destination service not providing a direct shareable link. Some services might upload the file but require manual steps to make it public or generate a shareable link. ShareX aims to get the direct link, but changes in service APIs can sometimes break this.
Manual Retrieval of the Link
If you suspect the upload completed but the link wasn't copied, you can try to manually retrieve it.
- Refer to the "Read the Upload Row in the Task List" section. If the task shows "Uploaded" status but no link, select the task.
- In the "Details" pane, look for the "URL" field. If a URL is present, copy it manually and test it in a web browser.
- If no URL is present in the "Details," then the upload either truly failed, or ShareX could not extract the URL from the destination's response.
Destination Rejects the File
Even if network connectivity is good and authentication seems correct, the upload destination might still reject your file for various reasons. This often results in a specific error message from the server that ShareX displays in the task details.
File Type or Size Restrictions
Many online services impose limits on the types and sizes of files you can upload.
- File Type: Some image hosts only accept common image formats like PNG, JPG, or GIF. If you're trying to upload a less common format, a video, or another file type, the destination might reject it. ShareX often converts images to a preferred format (e.g., PNG) before upload, but this isn't always the case for all captures or destinations.
-
File Size: Upload destinations typically have a maximum file size limit per file or per account. If your screenshot, GIF, or video recording exceeds this limit, the upload will fail. Check the service's documentation for these limits.
- For large files, consider using a destination with higher limits, or optimize the file size before upload. ShareX's "Image effects" and "Video converter" tools can help reduce file sizes.
Account Quota Exceeded
Many free and even some paid services have storage or bandwidth quotas. If you've uploaded too many files or exceeded your monthly bandwidth, the destination will reject further uploads until your quota resets or you upgrade your account.
- Check your account status directly on the upload service's website.
- The error message in ShareX might explicitly state "Quota exceeded" or "Storage limit reached."
Invalid Filename or Path
While less common for built-in destinations, if you're using a custom uploader documentation or a destination like FTP/SFTP where you specify a path, an invalid character in the filename or an incorrect directory path could cause rejection.
- Ensure filenames are web-friendly (avoid special characters, spaces are often converted to hyphens or underscores).
- Verify that the target directory exists and that your account has write permissions to it.
Content Moderation
Some public image or file hosting services employ content moderation. If the captured content is deemed inappropriate or violates their terms of service, the upload might be rejected. This is rare for a first-time failure but can occur.
Authentication or Token Expired
One of the most frequent reasons for ShareX upload not working is an issue with authentication. Many services use API keys, OAuth tokens, or traditional username/password combinations to verify your identity. These credentials can expire, be revoked, or become invalid.
Re-authenticate the Destination
The most straightforward fix for authentication issues is to re-authenticate with the service.
- In the main ShareX window, click on "Destinations" in the left-hand menu.
- Select the type of destination (e.g., "Image uploader," "File uploader," "Video uploader").
- From the dropdown list of services, select the one that is failing.
- For many services, there will be an "Authenticate" button or a field to enter an API key or token. Click this button or re-enter your credentials. This usually opens a web browser to the service's login page, where you grant ShareX permission again.
- If you're using an API key, copy the new key from the service's developer settings page and paste it into the corresponding field in ShareX.
After re-authenticating, try another upload to see if the issue is resolved.
Check Account Status on the Service
Sometimes, an account on the destination service might be temporarily suspended, locked, or deleted. This would invalidate any tokens or API keys associated with it.
- Log in directly to the service's website (e.g., Imgur, Dropbox, your self-hosted S3 bucket) using your web browser.
- Verify that your account is active and in good standing.
- Check if there are any specific warnings or notifications about API access or third-party application permissions.
Review Custom Uploader Authentication
If you're using a custom uploader documentation, the authentication method is entirely defined by your script or configuration.
- API Keys/Tokens: Ensure the API key or token embedded in your custom uploader script is still valid and correctly formatted.
- HTTP Headers/Parameters: If your custom uploader sends authentication details in HTTP headers or as POST parameters, verify that these are correct and match the service's current requirements.
-
Self-hosted services: For services like a self-hosted S3 setup, ensure your AWS access key ID and secret access key are correct and that the IAM user or role has the necessary permissions (e.g.,
s3:PutObject,s3:GetObject) for the target bucket.
Network, Proxy, and Firewall Blocks
Connectivity issues are a common culprit when ShareX upload is not working. Your network configuration, local firewall, or proxy settings can prevent ShareX from reaching the upload destination.
Test Basic Internet Connectivity
Before diving into ShareX-specific settings, ensure your computer has general internet access.
- Open a web browser and try to access a few different websites (e.g., Google, your upload destination's website).
- If you cannot access websites, the issue is with your general internet connection, not specifically ShareX.
Windows Firewall
The Windows Defender Firewall or a third-party firewall can block ShareX's outgoing connections.
- Open Windows Security (search for "Windows Security" in the Start Menu).
- Go to "Firewall & network protection."
- Click on "Allow an app through firewall."
- Click "Change settings" (you may need administrator privileges).
- Scroll down to find "ShareX" in the list. Ensure that both "Private" and "Public" networks are checked for ShareX.
- If ShareX is not in the list, click "Allow another app...", then "Browse...", and navigate to the ShareX installation directory (typically
C:\Program Files\ShareXorC:\Program Files (x86)\ShareX). SelectShareX.exeand add it. Then ensure its network access is allowed. - If you have a third-party antivirus or firewall, consult its documentation to ensure ShareX is allowed to make outgoing connections.
Proxy Settings
If your network uses a proxy server, ShareX needs to be configured to use it.
- In the main ShareX window, click on "Application settings" in the left-hand menu.
- Go to the "Proxy" tab.
-
If your network requires a proxy, select the appropriate "Proxy type" (e.g., "HTTP," "SOCKS4," "SOCKS5").
- Enter the "Host" (proxy server address) and "Port."
- If authentication is required, enter your "Username" and "Password."
- If you're unsure about your proxy settings, check your Windows Internet Options (search for "Internet Options" in the Start Menu, then go to the "Connections" tab and click "LAN settings").
- Test the proxy settings by attempting an upload.
DNS Issues
Domain Name System (DNS) issues can prevent your computer from resolving the upload destination's server address.
- Try flushing your DNS cache: Open Command Prompt as administrator and type
ipconfig /flushdns, then press Enter. - Consider temporarily changing your DNS servers to public ones like Google DNS (8.8.8.8 and 8.8.4.4) or Cloudflare DNS (1.1.1.1 and 1.0.0.1) in your network adapter settings.
Recovering the File After a Failed Upload
When a ShareX upload is not working, the original file is usually still present on your local system, allowing you to recover it and attempt a manual upload or upload using a different destination.
Locate the Local File
ShareX saves a local copy of every capture and recording before attempting an upload.
- In the main ShareX window, click on "History" in the left-hand menu.
- Find the entry for the failed upload.
- Right-click on the entry.
- Select "Open file location." This will open File Explorer directly to where the captured image, GIF, or video file is stored.
Alternatively, you can navigate directly to your ShareX screenshots folder, which is typically located at C:\Users\YourUsername\Documents\ShareX\Screenshots. Within this folder, files are usually organized by year and month.
Manually Upload the Recovered File
Once you have located the file, you can attempt to upload it manually using ShareX or another method.
-
Using ShareX:
- In the main ShareX window, click on "Upload" in the left-hand menu.
- Select "File..." (or "Folder..." if you want to upload multiple files from a specific folder).
- Browse to the location of your recovered file and select it.
- ShareX will then attempt to upload the file using your currently selected "Image uploader" or "File uploader" destination. This is a good way to test a different destination.
-
Using a Web Browser:
- Open your preferred upload destination's website in a web browser.
- Log in to your account.
- Use their web interface's upload function to manually upload the recovered file. This confirms if the issue is with ShareX or the destination service itself.
This recovery process ensures that your captured content is not lost, even if the automatic upload fails.
Switching to a Destination You Control
If you frequently encounter issues with public image or file hosting services, or if you require more control over your uploaded content, switching to a self-hosted or personally controlled destination can be a robust solution. This approach can mitigate problems related to service outages, quota limits, and content moderation policies of third-party providers.
Advantages of Self-Controlled Destinations
- Reliability: You control the server, so you're less susceptible to third-party service outages or policy changes.
- Storage & Bandwidth: Your limits are typically determined by your server's capacity and your hosting plan, often more generous than free public services.
- Privacy & Security: You have full control over who can access your files and how they are stored.
- Customization: You can set up custom domains, file paths, and post-upload actions.
Popular Self-Controlled Options for ShareX
ShareX supports several types of self-controlled destinations:
-
FTP/SFTP: If you have access to a web server or hosting plan that provides FTP or SFTP access, you can configure ShareX to upload directly to it.
- In ShareX, go to "Destinations" > "File uploader settings."
- Select "FTP" or "SFTP" from the dropdown.
- Enter your "Host," "Port," "Username," "Password," and the "Remote path" where files should be uploaded.
- Configure the "URL" field to match your web server's public URL structure (e.g.,
https://yourdomain.com/uploads/%fwhere%fis the filename).
-
Amazon S3 or S3-compatible storage: Services like Amazon S3, DigitalOcean Spaces, MinIO, or Wasabi provide highly scalable and reliable object storage. ShareX has built-in support for S3.
- Refer to the self-hosted S3 setup documentation for detailed instructions.
- Essentially, you'll need your "Access key ID," "Secret access key," "Bucket name," and "Endpoint" for the S3-compatible service.
- Ensure the IAM user or access key has the necessary permissions to put objects into the specified bucket.
-
Custom Uploaders: For maximum flexibility, you can create a custom uploader documentation. This allows you to write a script or define a request that interacts with virtually any web service or API.
- This is ideal for integrating with custom file management systems, cloud storage services not natively supported, or services with unique authentication flows.
- You can define the HTTP request, authentication headers, and how ShareX extracts the resulting URL from the server's response.
By setting up an automatic upload workflow to a destination you control, you can significantly reduce the likelihood of "ShareX upload not working" issues and gain greater autonomy over your digital assets.
Frequently Asked Questions
Why does my upload fail with a "401 Unauthorized" error?
A "401 Unauthorized" error means the credentials ShareX is using for the upload destination are incorrect or expired. You need to re-authenticate the destination in ShareX's settings, typically by entering a new API key or re-logging through a web browser. Check your account status directly on the service's website to ensure it's active.
My upload succeeded, but no link was copied to the clipboard. What happened?
This usually indicates that the "Copy URL to clipboard" option in ShareX's "After upload tasks" is unchecked. Ensure this task is enabled. Alternatively, if you're using a custom uploader, its configuration might not be correctly extracting the URL from the destination's response.
Can my firewall block ShareX uploads?
Yes, your Windows Defender Firewall or a third-party firewall can prevent ShareX from connecting to upload destinations. You need to ensure ShareX.exe is explicitly allowed to make outgoing connections through your firewall settings for both private and public networks.
How can I find a file that failed to upload?
ShareX saves a local copy of every capture. Go to ShareX's "History" pane, right-click on the failed task, and select "Open file location." This will take you directly to the file on your computer, allowing you to manually upload it or try a different destination.
What if my upload destination has file size limits?
Many public and some private services impose limits on file size. If your upload fails due to exceeding a limit, you will need to either use a different destination with higher limits, or reduce the file size of your capture before uploading. ShareX's image effects and video converter tools can help with optimization.
Get ShareX for Windows
ShareX is free and open source. Install it, then come back and try the steps above.
Download ShareX