ShareX Upload Settings and Destinations
How ShareX decides where a capture goes, and how to keep uploads deliberate rather than automatic.
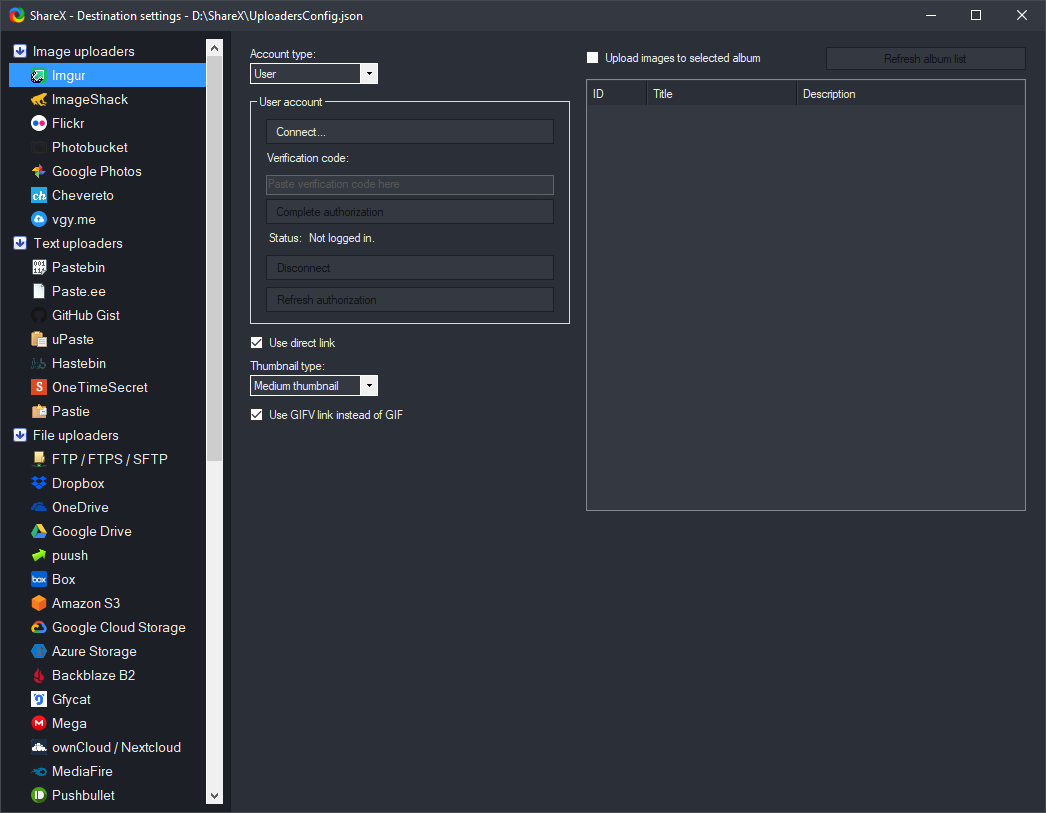
ShareX offers extensive control over how your captured content and files are handled after creation. Whether you're taking a screenshot, recording your screen, or uploading a file directly, you can configure ShareX to save locally, upload to various online services, or perform both actions simultaneously. This guide will walk you through the various ShareX upload settings, helping you manage your captured content efficiently and securely.
Save Locally, Upload, or Both
ShareX provides flexible options for managing your captures and file uploads. You can choose to save files to your local drive, upload them to a remote destination, or do both. These preferences are primarily controlled through "After capture tasks" and "After upload tasks" found in the main ShareX window.
After Capture Tasks
These tasks define what happens immediately after a capture is made.
- Save image to file: This is enabled by default and saves your capture to a local folder on your computer. You can configure the save path and file naming conventions in "Task settings" > "Save image" or "Save file".
- Save image to file as: This prompts you to choose a save location and filename each time, rather than saving automatically to a predefined path.
- Copy image to clipboard: Copies the image data directly to your clipboard, allowing you to paste it into other applications.
- Copy file to clipboard: Copies the file itself (not the image data) to your clipboard, useful for pasting into file explorers or email attachments.
- Upload image to host: This task initiates the upload process to your selected image host. This is often paired with "Save image to file" if you want a local copy and an online copy.
- Upload file to host: Similar to uploading an image, but for other file types.
- Perform actions: Allows you to apply various image effects or other custom actions before saving or uploading.
You can enable or disable these tasks by clicking on them in the "After capture tasks" menu. A checkmark indicates an active task. For example, if you want to save screenshots locally and also upload them, ensure both "Save image to file" and "Upload image to host" are checked.
After Upload Tasks
These tasks are executed only after a file has been successfully uploaded to a remote destination.
- Copy URL to clipboard: This is a commonly used task that automatically places the direct URL of your uploaded file onto your clipboard.
- Show QR code: Displays a QR code that links to the uploaded content.
- Open URL: Opens the uploaded file's URL in your default web browser.
- Shorten URL: If you have a URL shortener configured, this task will shorten the URL before copying it or opening it. More on this in the "URL Shorteners and Link Formats" section.
- Show notification: Displays a desktop notification confirming the successful upload and providing the URL.
These options are crucial for streamlining your workflow, especially if you frequently share links to your captures. To learn more about automating your workflow, refer to our guide on how to
automate screenshot uploads.
Choosing an Image or File Destination
ShareX supports a wide variety of online services for uploading images, text, and other files. You can select your preferred destination(s) from the "Destinations" menu in the main ShareX window.
Image Uploader
This section allows you to choose where images are uploaded. Common choices include Imgur, Flickr, and various custom options.
- From the main ShareX window, click on Destinations.
- Hover over Image uploader.
- A list of supported image hosts will appear. Click on your desired host to select it. A checkmark will appear next to the selected host.
- Some hosts, like Imgur, may require you to authorize ShareX to access your account. Follow the on-screen prompts if this is the case.
File Uploader
Similar to image uploaders, this section lets you choose destinations for general files. This includes services like Google Drive, Dropbox, or various FTP/SFTP options.
- From the main ShareX window, click on Destinations.
- Hover over File uploader.
- Select your preferred file host from the list.
Text Uploader
For text-based captures (like OCR results or copied text), you can choose a specific text host. Pastebin is a popular option here.
- From the main ShareX window, click on Destinations.
- Hover over Text uploader.
- Select your preferred text host.
URL Shortener
If you want to shorten the URLs of your uploaded content, select a URL shortener here.
- From the main ShareX window, click on Destinations.
- Hover over URL shortener.
- Select your preferred URL shortening service.
It's important to note that you can configure credentials for many of these services within "Destinations" > "Destination settings". This is where you'll input API keys, login details, or other authorization information required by the chosen host. For example, to set up an FTP uploader, you would go to "Destinations" > "Destination settings" > "FTP" and enter your server details.
Clipboard and Notification Behavior After Upload
After a successful upload, ShareX can automate several actions related to the uploaded content's URL. These are configured in "After upload tasks" as described earlier.
Copy URL to Clipboard
This is one of the most frequently used "After upload tasks." When enabled, ShareX automatically copies the direct link to your uploaded file to your clipboard. This allows you to immediately paste the link into a chat application, email, or document without any manual copying. To enable or disable this:
- From the main ShareX window, click on After upload tasks.
- Ensure Copy URL to clipboard is checked for automatic copying, or unchecked if you prefer to copy it manually.
Show Notification
ShareX can display a desktop notification after a successful upload. This notification typically includes a thumbnail of the uploaded image (for image uploads) and the URL. Clicking on the URL in the notification will open it in your default web browser. To configure this notification:
- From the main ShareX window, click on After upload tasks.
- Ensure Show notification is checked.
- For more detailed notification settings, navigate to Application settings > Notifications. Here you can customize notification duration, sound, and other behaviors.
Open URL
If you want to immediately view your uploaded content in a web browser, enable the "Open URL" after upload task. To enable or disable this:
- From the main ShareX window, click on After upload tasks.
- Check Open URL to have the link automatically open in your browser after upload.
These settings collectively ensure that your workflow after an upload is as smooth and efficient as possible, minimizing the steps required to share or access your content.
URL Shorteners and Link Formats
ShareX integrates with various URL shortening services and allows you to customize the format of the links it generates. This is particularly useful for sharing long URLs, or for embedding links in specific ways.
URL Shorteners
To use a URL shortener:
- First, select your preferred URL shortener in Destinations > URL shortener. Popular options include Bitly and custom services.
- If the service requires authentication (e.g., an API key), navigate to Destinations > Destination settings > URL Shorteners and configure the selected service.
- Finally, enable the Shorten URL task under After upload tasks. When this is active, ShareX will automatically shorten the uploaded file's URL before copying it to the clipboard, opening it, or showing it in a notification.
Link Formats
ShareX offers extensive control over the format of the copied URL. This is managed in
Task settings>
Upload>
URL options. Here you can find options such as:
- URL shortener: Confirms which URL shortener is active.
- URL format: This is a powerful setting that allows you to define how the URL is presented. You can use placeholders to include various pieces of information. For example:
{url}: The direct URL to the uploaded file.{filename}: The filename of the uploaded content.[url={url}]Image[/url]: BBCode format for embedding an image.{filename}: HTML format for a clickable link.
[url={url}]My Screenshot[/url]. - Direct URL: If your chosen host provides both a direct URL and a page URL (e.g., Imgur provides a direct image link and a page where the image is hosted with comments), this option ensures ShareX uses the direct link.
- Shorten all URLs: This checkbox determines if all URLs (not just uploaded ones) that pass through ShareX's URL shortening task should be shortened.
These settings provide fine-grained control over how your links appear and function, adapting ShareX to your specific sharing needs.
Privacy Before You Upload Anything
Before uploading sensitive information to any public or private host, it's crucial to consider privacy implications. ShareX provides tools to help you manage and protect your data.
Image Editor and Annotation
The built-in ShareX image editor is invaluable for redacting or blurring sensitive information before uploading. After capturing an image, the editor can be automatically opened if "Open image editor" is enabled in "After capture tasks". Within the image editor, you can use tools such as:
- Blur: To obscure text or faces.
- Pixelate: Another option for obscuring areas.
- Rectangle, Ellipse, Line, Arrow: To highlight or cover specific areas.
- Text: To add explanatory notes or cover sensitive text with new text.
Always review your capture in the editor to ensure no sensitive data is visible before proceeding with an upload.
Local Saving vs. Uploading
For highly sensitive information, consider only saving locally and avoiding uploads entirely. You can disable "Upload image to host" and "Upload file to host" in "After capture tasks" to ensure content never leaves your computer. If you need to share it, you can manually select a secure method after careful review.
Choosing Your Host Wisely
Different upload destinations offer varying levels of privacy and security.
- Public hosts (e.g., Imgur without an account, Pastebin): Content uploaded here is often publicly accessible or easily discoverable, even without direct links. Be extremely cautious about what you upload to these services.
- Private accounts (e.g., Imgur with account, Google Drive, Dropbox): When uploading to your own account on these services, you typically have more control over who can view the content. Ensure your account's sharing settings are configured for privacy (e.g., "private," "only people with link can view," or "specific users").
- Self-hosted (e.g., FTP/SFTP to your own server, custom uploaders): This provides the most control over your data, as it resides on hardware you manage. However, you are then responsible for the security, backups, and availability of your server. For more advanced configurations, see our custom uploader documentation.
Always read the terms of service and privacy policy of any online service you use for uploading. ShareX facilitates the upload process, but the responsibility for data privacy ultimately rests with the user and their chosen destination.
Custom Uploaders and Your Own Storage
ShareX's power is significantly extended by its support for custom uploaders, allowing you to send files to virtually any service or server that accepts HTTP requests, FTP/SFTP, or other common protocols. This is ideal for those who prefer to use their own storage solutions or niche services.
Creating a Custom Uploader
To create a custom uploader:
- From the main ShareX window, click on Destinations > Custom uploader settings...
- In the "Custom uploaders" window, click New to add a new uploader.
- You'll be presented with various tabs to configure your uploader:
- Uploader Type: Choose between "Image uploader," "File uploader," or "Text uploader" depending on what this custom uploader will handle.
- Request: This is where you define the HTTP request (URL, method, headers, body) that ShareX will send. For example, you might use a
POSTrequest to a PHP script on your web server. - Arguments: Define the parameters to send with your request, often used for API keys, filenames, or other data.
- Headers: Add custom HTTP headers if required by your service.
- URL: Specify how ShareX should extract the final URL of the uploaded file from the server's response. This often involves using JSONPath or regular expressions to parse the response body.
- Deletion URL: If your service supports deleting uploaded files, you can configure the request here.
- Thumbnail URL: For image hosts, you can specify how to get a thumbnail URL.
- After configuring, click Test to ensure your uploader works correctly.
- Click Save to add your custom uploader to the list.
Once saved, your custom uploader will appear in the "Destinations" menu under "Image uploader," "File uploader," or "Text uploader," ready for selection.
FTP/SFTP Uploaders
For direct uploads to your own server:
- From the main ShareX window, click on Destinations > Destination settings...
- In the "Destination settings" window, navigate to the FTP tab.
- Click New to add a new FTP/SFTP profile.
- Enter your server's hostname, port (21 for FTP, 22 for SFTP), username, password, and the remote path where files should be uploaded. You can also specify a URL path if your server is web-accessible.
- Select the appropriate "Protocol" (FTP, FTPS, SFTP).
- Click Test to verify your connection and settings.
- Click OK to save the profile.
After setup, you can select your FTP/SFTP profile from
Destinations>
File uploader(and potentially Image uploader/Text uploader if configured to handle those types). Using custom uploaders and FTP/SFTP allows you to maintain full control over your uploaded content, offering flexibility beyond the pre-configured commercial services. If you encounter issues with uploads, you can consult our guide on how to
fix failed uploadsfor troubleshooting steps. For a broader overview of ShareX's capabilities, explore
the ShareX settings map.
Frequently Asked Questions
My uploads are failing. What should I do?
First, check your internet connection. Then, go to "Destinations" > "Destination settings" and verify the credentials for your chosen uploader. If it's a custom uploader, re-test its configuration. You can also review the ShareX log for specific error messages, which can provide clues to the problem.
How do I stop ShareX from uploading everything?
To prevent automatic uploads, go to "After capture tasks" in the main ShareX window. Uncheck both "Upload image to host" and "Upload file to host." This will ensure that captures are only saved locally or copied to your clipboard, depending on your other selected tasks.
Can I upload to multiple destinations at once?
ShareX does not natively support uploading a single capture to multiple distinct online hosts simultaneously (e.g., Imgur and Google Drive at the same time). You can, however, save locally and upload to one host, or use custom uploaders to chain multiple requests if your custom script handles it.
How do I change the folder where ShareX saves images locally?
To change the local save path, go to "Task settings" > "Save image" in the main ShareX window. You can then specify a new "Image folder path" and customize the "File name pattern" for how files are named when saved to that location.
I want to use a specific URL shortener not listed in ShareX. Is that possible?
Yes, you can configure a custom URL shortener. Go to "Destinations" > "Custom uploader settings..." and create a new custom uploader with the type "URL shortener." You'll need to know the API endpoint and expected response format of your desired shortening service to configure the request and URL parsing correctly.
Get ShareX for Windows
ShareX is free and open source. Install it, then come back and try the steps above.
Download ShareX